
A related page about keyboards for the IBM PC and their scan codes.
These pages are primarily concerned with keyboard layouts, that is, the arrangement of keys on a computer keyboard, and it looks at them from a historical viewpoint, going back to the keyboards found on some quite early computers.
However, before getting started on the primary topic of these pages, I will at least briefly touch upon what people are perhaps more likely to be thinking of when they look for a page about keyboards:
Two important and informative discussion boards for mechanical keyboard enthusiasts are:
The Deskthority site also has an extensive wiki about keyboards.
A major manufacturer of mechanical keyswitches that is still in business is Cherry, which is a German company. A number of other makers of mechanical keyswitches imitate the style of its plungers, so as to be able to use the same key caps, and also the color coding they use for their MX series of switches:
Linear
Red     Black    Dark Grey

Tactile
Brown   Clear    Dark Grey

Clicky
Blue    Green
A linear switch is one that does not have a "bump" of increased tactile resistance as it is pressed. These tend to be preferred for use in computer games, as they can be more quickly pushed repeatedly.
A tactile switch does have a "bump" of increased tactile resistance, and this type of switch is preferred for touch-typing.
A clicky switch is a tactile switch which also gives audible feedback; generally, because efforts have not been made to suppress the noise inherent in a tactile key design.
The Cherry colors listed above are in order of increased force required to press the keys; the last one in each list is usually only used for the spacebar.
Another maker of highly-regarded mechanical key switches is ALPS, but they are no longer in the business of making keyswitches, but some companies, including the Canadian company Matias, manufacture keyswitches according to their design.
The IBM Personal Computer came with a keyboard from IBM that was in the "clicky" class, but unlike the usual mechanical keyboard, it did not consist of individual key switch modules on a circuit board. Instead, there was a membrane with contacts, below a mechanical assembly.
This keyboard used a spring which was free to buckle when the keys were pressed, and so it was called a "buckling spring" keyboard. The tactile feel of the IBM keyboard is highly regarded. The earliest PC keyboards from IBM, instead of using a membrane that registered a key press by being pushed to make contact, used a printed circuit board with exposed squares of copper that were connected to circuits that detected the approach of another conductor on the key through capacitance.
Before the need to reduce costs for a consumer product arose, terminals for IBM mainframe computers used what is known as a "beam spring" keyboard. These were also capacitatively sensed. A U-shaped piece of spring steel held a flexible band of metal normally in the position of being curved upwards. Pressing the key changed it to being curved downwards, pushing apart the arms of the U between the two states; this provided the tactile feedback.
Another type of keyboard that is highly regarded by many mechanical keyboard enthusiasts is the Topre. It appears to be not much different, except for having a spring associated with each key, from a conventional inexpensive rubber-dome keyboard, but it has a tactile feedback similar to that of the IBM Personal Computer keyboard, but with a lighter touch.
Also, before getting started, it may be appropriate to address one common question about computer keyboards: why do some keyboards have a "Return" key, while others have an "Enter" key?
On the keyboard of a Teletype teletypewriter, one will find both a key labelled "Return", and another key labelled "Line Feed". The characters those keys transmit, when sent to a page printer, cause, respectively, the carriage to return without advancing the paper for the Return key, and the paper to advance to the next line for the Line Feed key.
As the mechanical function for carriage return took time, usually carriage return was done first; the line feed could take place during the carriage return without causing a mechanical conflict.
When a computer terminal which resembled a Teletype in its behavior - perhaps a Teletype, perhaps a different kind of printing terminal, perhaps a video terminal of the "dumb terminal" type - was connected to a computer, the usual convention was that the terminal would be connected in "full-duplex" mode.
That meant that if the computer was turned off, and the user typed on the keyboard, nothing would happen. In "half-duplex" mode, on the other hand, the terminal would behave like a typewriter, and the user could type even if the computer was not present.
And so as the user types a line of text, the computer would echo each character back to the terminal, in order that the user can see what he or she is typing. Then, when the carriage return is pressed, the computer would echo a carriage return, then a line feed, and perhaps some "null" characters as well - or just remember that the terminal is likely to be busy for a certain time.
Some computer systems, particularly ones running UNIX, expected the user to press "Line Feed" at the end of a line instead, but upon the press of that key, they still echoed the same sequence of characters.
This, at least, is the situation that applies to ASCII teletypewriters (or even 5-level "Baudot" teletypewriters, sometimes used as computer terminals in the early days) and ASCII "dumb" video terminals.
However, the difference between "Return" and "Enter" isn't an ASCII versus EBCDIC thing.
The IBM 2741 terminal, which was a printing terminal based on the mechanism of the IBM Selectric typewriter, also had a Return key.
However, there were some little differences.
The IBM 2741 was usually connected to a control unit, which was then connected to a channel processor, and the channel processor was connected to the host computer (although, for the smaller models in the System/360 series, the "channel processor" was really the main CPU running a different set of microcode) rather than to the computer directly. As part of the philosophy of not keeping the main CPU too busy, the connection between the IBM 2741 and its controller was half-duplex; characters didn't have to be echoed, as the 2741 typed everything entered on its keyboard.
When the Return key was pressed, the keyboard of the 2741 locked, until an explicit signal came back from the computer to unlock it. The element returned to the beginning of the line, and the paper also advanced, as a direct result of pressing the Return key; no separate "line feed" control code had to be echoed.
On some printing terminals, particularly the Flexowriter, a key with the function of returning the carriage and advancing the line, exactly like the "carriage return" key on a typewriter, was called the "New Line" key instead of the "Return" key.
Above, we mentioned video terminals, and we noted that on one kind of video terminal, the "dumb terminal", there was a Return key, just like on printing terminals.
Guess what the other kind of video terminal is? Well, that was easy; they were called "intelligent terminals".
Quite a few ASCII intelligent terminals were made at one time, such as the HP 2645 and the Anderson-Jacobson AJ 510. But the inspiration for the intelligent terminal comes from the IBM 3277 display station, and also its predecessor, the IBM 2260 terminal.
These terminals were primarily designed for data entry.
First, the computer would send characters to the terminal to print a form on the screen of the terminal. Since the text of the form was static, it was displayed on the screen as characters that were dim compared to the brighter characters typed by the user.
When the user typed, text by the user would be entered into the blank areas on the form that were set aside for user input; these areas were called fields.
The TAB key was used to advance from one field to the next.
Some fields could be large boxes with more than one line. The RETURN key was used to move from one line to the next within such a field.
And then, finally, when the whole form (or, at least, the whole page of the form that could fit on the screen) had been filled out, the user would press the ENTER key to send everything that had been typed to the computer.
And this actually did send everything that was typed to the computer, because the terminals and their controllers were designed to do as much work as possible in order to avoid burdening the main computer unnecessarily.
An ASCII "intelligent terminal" worked in much the same way, although it used the same type of connection between itself and the host computer as a "dumb terminal". So it didn't communicate to a special controller; instead, the extra functionality of an intelligent terminal was located within the terminal itself.
Such a terminal operated in "block mode" since instead of sending single characters to the computer, and expecting a reply, it sent the whole contents of the screen to the computer after ENTER was pressed.
It was possible to use a 3277 for interactive programming in the same way as a 2741. The screen would simply only have one field present for typing, the place where the new line being typed would go.
However, additional functionality was available. One could cursor up to a previous line, make some changes, and hit ENTER while on that line; then the old line would go back to its old state, and the edited version of the old line would appear as the last line typed.
Since the functionality of the ENTER key was built into the terminal and its controller, it was the ENTER key that had to be used for this purpose, although it was in a somewhat inconvenient spot on the 3277 keyboard.
Also, it was possible to make a visual file editor that would run on a 3277; however, only a small group of lines that could fit on the screen could be visually edited at one time.
When IBM came out with the 5100 Portable Computer, the key in the position of the carriage return key on an electric typewriter was labelled "Execute", because that seemed to best express its function; after the user types something, pressing "Execute" tells the computer to do what has been typed.
When the IBM Personal Computer came out, while the key on the main cluster that included the alphabetic keys had an arrow on it, like the return key on a 3277, the key with the same function in the numeric keypad was labelled the Enter key. So each one of those two keys was taken to be an Enter key, even though their function was usually the same as that of the Return key on other computers.
I don't know if anyone at IBM had ever thought of using those two keys for different functions if an IBM PC were to run software emulating a terminal like the 3277; if that had been thought of, the idea appears to have been abandoned as too confusing to users.
Basically, therefore, the reason the IBM PC has an "Enter" key is due to a clash of cultures, between IBM, where intelligent terminals designed for data entry were the norm, and the outside world, where dumb terminals designed for text communications were the norm.
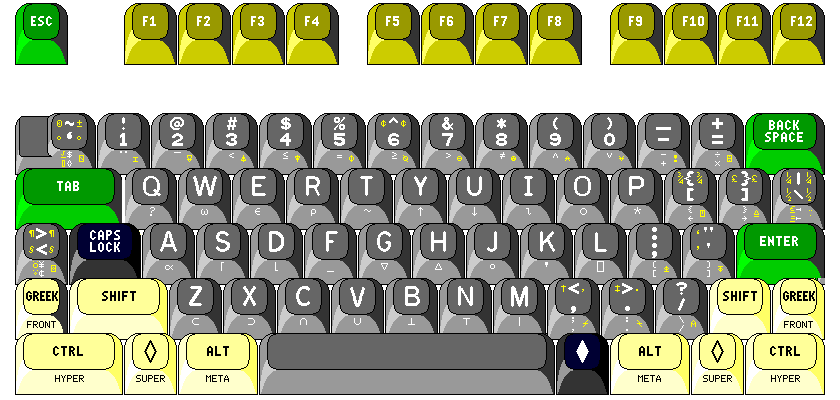
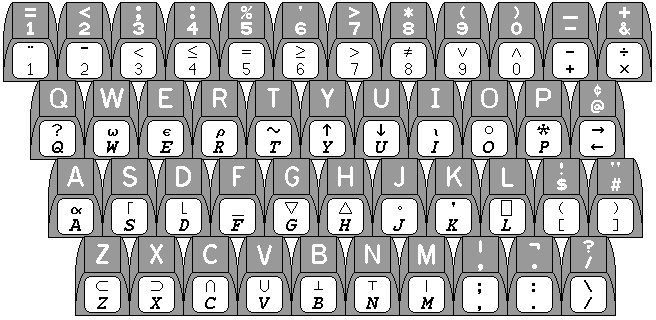
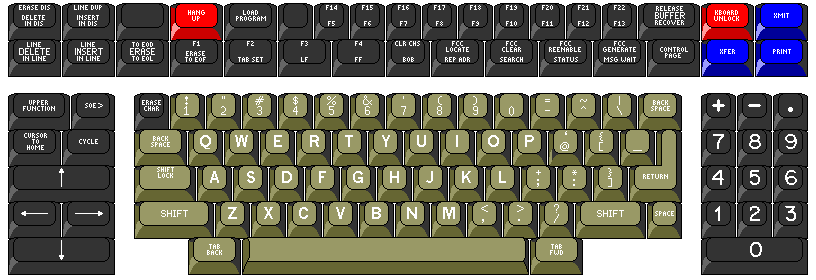
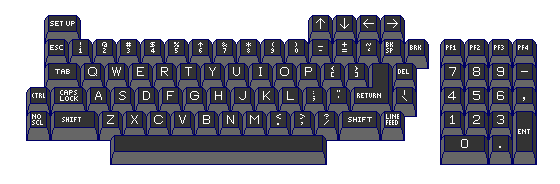
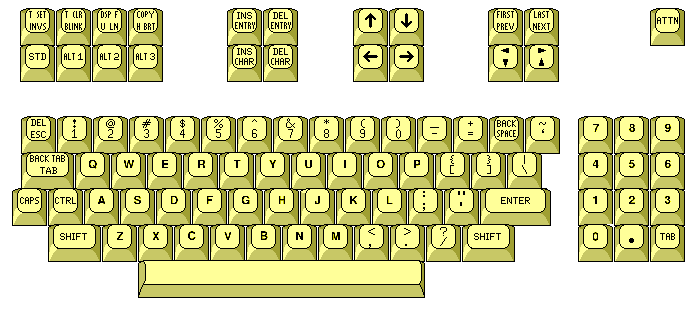
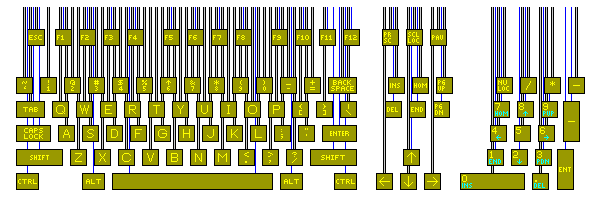
There are many aspects to the architecture of a computer besides its instruction set. As an example of a user-interface element that varies from one computer to another, here is a laptop-esque keyboard in what I consider to be a very nice, if old style, color scheme:
The various keys are colored as follows:
These choices of color, besides making keys of different general types easy to distinguish, reflect various computer systems or terminals that I have happened to have the opportunity to use. The grey color of the printable character keys, in addition to reflecting many older terminals, also follows innumerable electric typewriters.
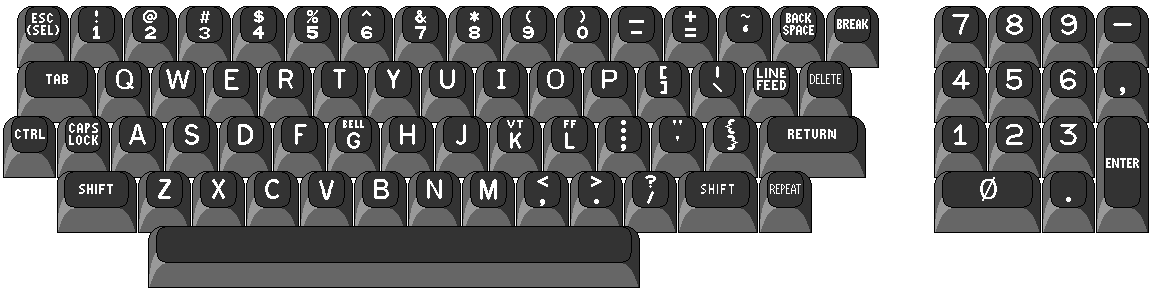
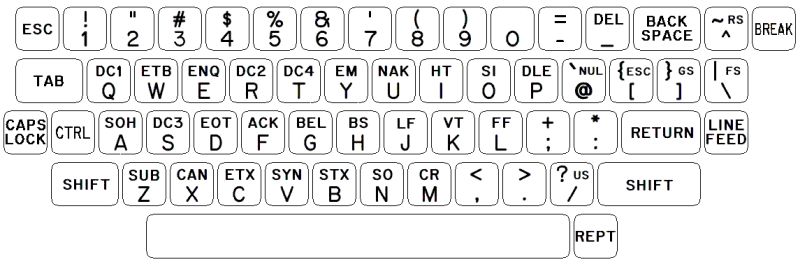
This illustration
shows the subtle changes I would like to make to the keyboard that is standard on computers compatible with the IBM PC.
The APL character set is shown on the front of the keys. To allow the correspondence between the APL characters and the usual ASCII characters to seem more sensible, while keeping the APL characters in their usual positions, I had thought to modify the arrangement of the three keys to the right of the letter P. However, for general usefulness, it seems more appropriate to retain the standard typewriter-pairing APL/ASCII encoding, since the only character moved as a result from its conventional position on the APL keyboard is the right-arrow used for branching. As well, if the keys with their scan codes were actually re-arranged, which would seem to be required for maximum compatibility, then international versions of the keyboard would, in some cases, be compromised. Also, for the purpose of keeping paired keys together, the overstruck characters shown in yellow on the right of the front of the keys, while mostly corresponding to the arrangement found on a version of the IBM 3277 display station, are modified by a rearrangement which places the comment or lamp character on the ? and / key.
Also, largely following an IBM 122-key keyboard designed for APL, the six extra characters added to the APL character set on most ASCII terminals have four of the overstrikes added for APL2 shown as replacements on the right (the braces are left alone). The remaining three new APL2 overstrikes are placed as APL alternate characters on the extra keys. Two that were found on the extra > < key on the 122-key keyboard I used as a basis have been moved to the ~ ` key, since that is part of the real keyboard, however. The seventh extra APL2 character is the APL alternate character on the | \ key.
Other additional APL overstrikes, found on I. P. Sharp's Union keyboard, are placed on the remaining available keys; the > < key has two overstrikes for yen and cent sign as its basic characters, following the pattern of the dollar-sign overstrike in APL/ASCII, with diaresis circle and diaresis null as overrides; admittedly, this makes it awkward to access that full character set, since in general it was thought the overrides would be accessible on an either-or basis.
On the right of the regular face of the keys, also in yellow, are alternate characters for when the keyboard is switched into word processing mode, in which ASCII characters not found on a typewriter are exchanged for characters found on typewriters but not in 7-bit ASCII. On the left is a revised set of alternate characters, sometimes matching those for word processing mode, but not always, for typesetting mode; this, though, is probably excessive.
The extra key found on international versions of the PC keyboard is allowed to be present, but placed in an unobtrusive position. Originally, I had placed it on the left side of the left-hand shift key, but this has been changed to the left side of the CAPS LOCK key for reasons to be explained shortly.
In word processing mode, this key is used for the paragraph and section characters, which replace less than and greater than, and, as well, the comma and period keys are changed so as not to be affected by being shifted.
The keyboard is narrowed on the right-hand side, since the backspace, enter, and shift keys are all wider than necessary, and there is no reason, therefore, to have the | and \ key be wider than the others. But instead of narrowing the keyboard as a whole, the extra space this makes available can be used for two purposes on the left-hand side. The left-hand shift key can be made wider, ensuring that the extra international key (in its original position) is genuinely unobtrusive. As well, if the CAPS LOCK key is limited to normal width, an extra CTRL key can be placed in the traditional location many people are used to.
Placing the CAPS LOCK key on the far side of that extra control key seems reasonable, since a shift key has a greater need to be easily reachable when touch-typing. As well, to resolve the question of what scan code to use for a third control key, this key could be given a new scan code, switchable with that of the normal control key, so that it would have the alternate function of an additional shift key.
Instead, though, rather than switching a third shift key with the control key, I ended up leaving the Caps Lock key where it is; it could be the key to be switched, if desired, with the left-hand Control key. Thus, the international key is now on the far side of the Caps Lock key, and an additional shift key introduced on the outside of the shift keys on both sides of the keyboard.
Thus, the Alt, Windows-shift, and Ctrl keys in the bottom row could correspond to Meta, Hyper, and Super, respectively, while this new shift key could be used for the Greek/Front shift. In that mode, though, the keyboard would have no control key; otherwise, I manage to match the shift capabilities of the (in?)famous Space Cadet keyboard, which is illustrated on the next page.
Note that the additional graphic characters on the keys, such as the complete Greek alphabet and mathematical operators, to be reached with these additional shifts are not depicted on the keyboard; the APL character set is shown instead. But it is to be recognized that the extra shifts are partly to be used for allowing, in normal, non-APL mode, for reaching extra characters like those of the Space Cadet keyboard, as well as providing shortcuts for accessing editing functions within certain editors (particularly Emacs, of course).
But the control shift is also used in that situation. Well, since the Windows shift keys are already pressed into service, why not change the Windows menu key to the Caps Lock key, thereby letting the Caps Lock key be used as the Control key? Of course, the real Space Cadet keyboard, like the 101-key IBM PC keyboard, had paired control keys; one could chop a piece off the left of the space bar, making the new small key and the Windows menu key the control keys, I suppose, thus fitting a Space Cadet-like keyboard into the space of a 101-key PC keyboard, but it would probably be better to expand the keyboard a bit, so that neither the control keys nor the space bar would have to be cramped.
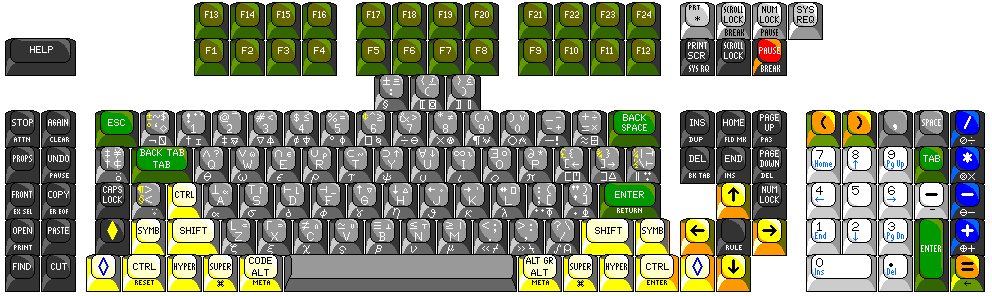
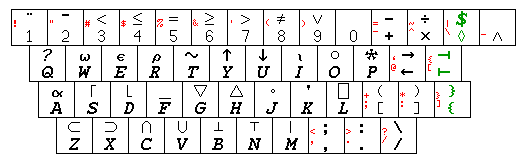
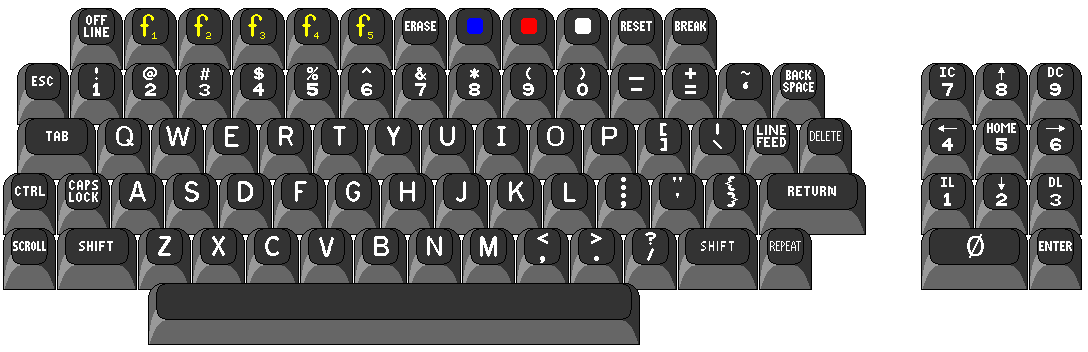
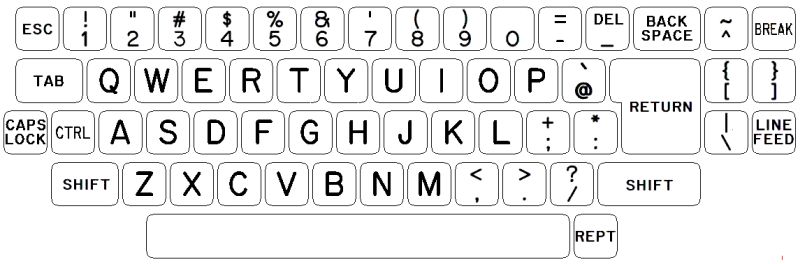
The previous keyboard illustration showed a basic set of keys that could fit on a normal PC keyboard, taking the same amount of space, even though moving the main area of the keyboard slightly to the right created space for a few additional keys. The emphasis was on showing how APL characters could be distributed.
Since, however, among the added keys were the extra shifts used with the Emacs editor, and on the Symbolics LISP machine, this inspired looking again at how an expanded keyboard which provides the extra keys used in a number of environments that people have grown fond of, and which can be hosted on a PC today.
Thus, the keyboard illustrated above has 148 keys, so that someone running Solaris on their machine, or someone running a system based on the old Symbolics LISP Machine software or someone connecting to an IBM mainframe via IBM terminal emulation, and thus wanting the extra keys from the 122-key keyboard: those who were doing any or all of those things would have all the keys they are looking for.
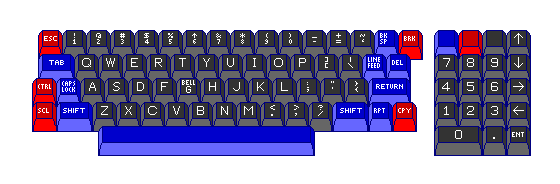
As for this color scheme that I favor, while since it is simply an aid to locating keys on a keyboard that is before one's eyes, there is no need to memorize the scheme; however, the following aid to recalling the scheme has come to my mind (perhaps anticipating its detractors):
On a ten-color keyboard,The tune to which it is to be sung should be obvious.
But now that doesn't count the eleventh color, light grey, used for keys preserved from the 83-key and 84-key keyboards for the IBM PC and AT... since the way their functions have been re-arranged could potentially create problems with legacy software expecting keys that generate single scan codes. The System Request key, shown for completeness, though, could be omitted: since PC hardware treats it as special, and it wasn't found on the original PC, it's unlikely any old software would have used it as just a key and in various shift states.
In my youth, designing imaginary keyboards with this color scheme, I included keys for "insert mode", "overstrike mode", and "replace mode". The "replace mode" key turned off both insert mode and overstrike mode. Insert mode worked only when the cursor was previously moved to the left using the 'cursor left' key, and worked the way insert mode works on most computers - causing characters to be typed to move those after them to the right. Overstrike mode worked only when the cursor was previously moved to the left using the 'backspace' key. So one could have insert mode and overstrike mode both turned on - and either insert when one used the cursor left key (a key typically found on electronic computer terminals, which could insert) or overstrike when one used the backspace key (found on typewriters, which can do naught but overstrike) or replace by using the "rub out" or "delete" key, nicely located below the right shift key, like the correction key on an IBM Selectric II typewriter.
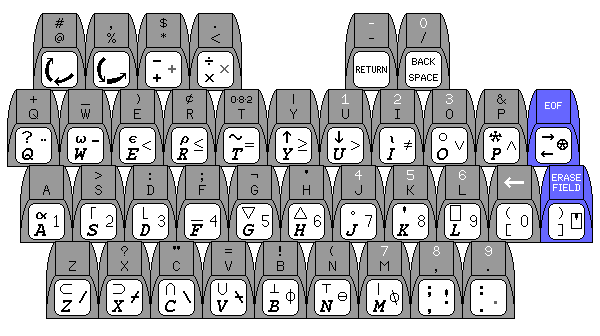
The keyboard illustrated at the top attempts to be compatible with that of the IBM Personal Computer. Below is illustrated a computer keyboard that does not make such an attempt:
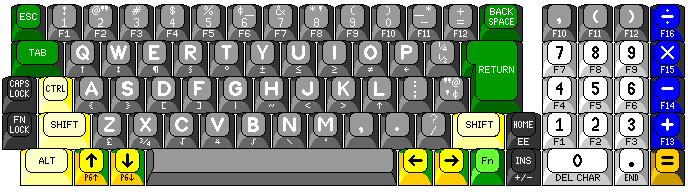
Back in the era of 8-bit computers, the number of keys on the keyboard was kept to a minimum. Sometimes, the type of key used was also compromised in quality. Gradually, however, 8-bit computers came out with larger keyboards and better-quality keys.
For example, the Sinclair QL computer (which was based on a version of the Motorola 68000 that had an 8-bit data bus, so, like the IBM PC, it was a 16-bit home computer) had a set of five function keys, and a full upper- and lower- case ASCII keyboard.
The keyboard above shows what might have become available had that trend continued somewhat further.
Since the computer is designed for home use, it has a main typing area with 44 keys, which is arranged like that of an electric typewriter, even to the extent of having the characters ¢, ½, and ¼. And, furthermore, since it is for home use, and people getting their first computer might previously have had only a manual portable typewriter, the keyboard allows switching to the manual typewriter keyboard arrangement as an option! When the CAPS LOCK key is used, the letter keys produce capital letters when not shifted, but when shifted, they produce 26 additional special characters, which include all the ASCII characters omitted from the main keyboard layout.
A numeric keypad is included, and it's a relatively generous one, including a comma key as may be convenient for entering lists of numbers, and all the basic keys needed for a calculator, even an enter exponent key.
The original IBM PC used the same keys for cursor keys and for the numeric keypad. Here, the four cursor keys are located near the main keyboard in a manner used with several computers and terminals, the Sinclair QL being one of the examples. Instead, to keep from having to add several function keys as well, the numeric keypad does double duty as a set of function keys, under the control of the FUNCTION LOCK (FN LOCK) key. But what if it is desired to use function keys with a spreadsheet program, which, making heavy use of numbers, is one where the numeric keypad is desired? Then Shift-FN LOCK instead turns the top row of 12 keys on the regular keyboard, when unshifted, into function keys.
The Fn key can be used always with both groups of keys for a function key function, and the Alt key can be used with the letter keys when not in caps lock mode for their special characters.
As there is no break key, a combination such as Control-Backspace might serve that function. Word processing programs on the PC often used the Alt key with the letter keys for special functions; here, the Code key may be used for that instead, and the Fn key could also be used with the letter keys for additional functions.
All in all, it seems like this is quite a powerful and convenient keyboard with only 82 keys. Since the +/- or change sign key, and the enter exponent key are only useful when the computer is simulating a calculator, two of the most popular advanced cursor functions, insert and home, are given to these keys as their usual functions. To make the other useful functions of Page Up, Page Down, Delete Char, and End Line as found on the PC keyboard available, at least as shifted functions, other keys along the bottom of the keyboard have been pressed into service.
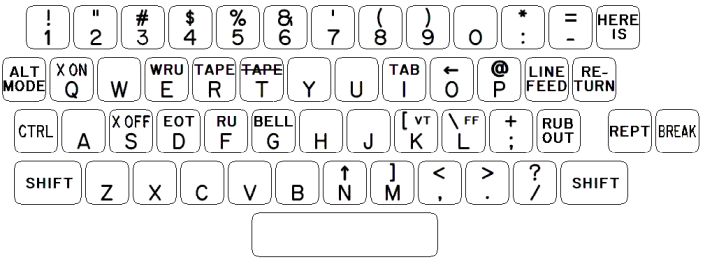
There is one alternative character set, sadly neglected on today's computers, that I would also wish to include on an ideal keyboard:
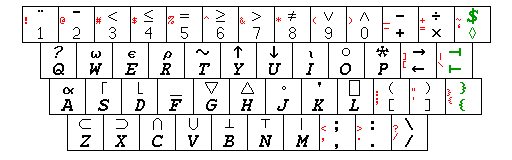

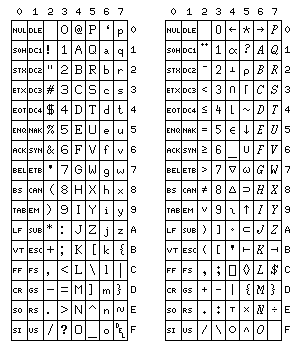
The illustration above, of course, shows the keyboard arrangement used for the programming language APL.
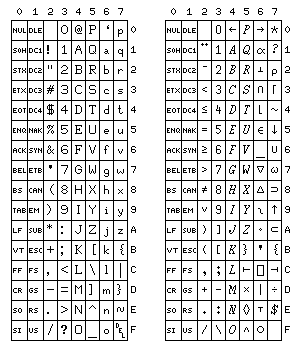
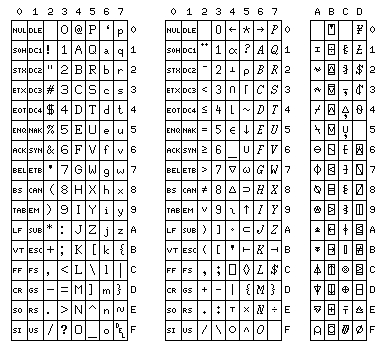
The small characters in red on the right of the keys show how the APL keyboard could be related to a particular ASCII keyboard arrangement, the typewriter-pairing keyboard, and an ASCII code chart is also provided, showing both normal ASCII, and the codes for the APL characters when transmitted from a terminal with this type of keyboard.
The typewriter-pairing, bit-pairing, and Model 38 Teletype arrangements for APL characters, of course, were originally simply de facto standards used by terminal and computer manufacturers.
However, I have learned that this arrangement, the typewriter-pairing APL/ASCII encoding, actually did manage to attain the status of an official standard: the Canadian Standards Association applied to the International Standards Organization to have it recognized as the standard ISO-IR-68, also referred to as "registered character set 68".
Interestingly enough, however, the character set was named "APL Character Set for Workspace Interchange". As this character set does not include codings for the overstruck characters, it would not have been particularly useful for that purpose, as representing overstruck characters by two characters with a backspace between them would be inefficient. Instead, like the other two versions of APL/ASCII, the purpose it did serve well was to allow ASCII terminals to be used for APL terminal sessions with mainframe computers or minicomputers, particularly ASCII printing terminals that would be capable of overstrikes, although a number of video terminals used these codings as well, although other video terminals used codings which represented overstruck characters with their own individual codes.
The bit-pairing and typewriter-pairing keyboard arrangements themselves, without any link to APL, were the subject of at least a proposed standard: ANSI x4A9/199B. This was the subject of an article in the March 1, 1971 issue of Datamation.
However, the article Inside ASCII by Bob Bemer, who participated in the development of ASCII, originally published in three issues of Interface Age magazine in 1978, only showed the bit-pairing keyboard because the typewriter-pairing keyboard was being studied for revision at the time. This may have contributed to the unfortunate use of the inferior bit-pairing keyboard on some devices made during that period, on the basis that it was the only "standard" option available. As we shall see, though, the typewriter-pairing keyboard as originally defined did end up being altered in one respect, with the square brackets and curly braces being moved from the arrangement shown above for the typewriter-pairing keyboard, with each pair on its own key, to the arrangement seen on the bit-pairing keyboard; the keyboard for the IBM PC was designed after that change had already run its course.
Of course, APL was originally used with IBM 2741 terminals, with 88 printable characters other than the space.
ASCII terminals had 94 characters; a standard was agreed upon for the extra six characters, and the first computer terminal I encountered which implemented this standard was the Tektronix 4014. An APL version of the Teletype Model 38 was another one of the earliest terminals to include them.
Since writing the above, I have learned the story behind those six additional characters. They were decided upon in 1972 at an APL user's group meeting held at Georgia Tech; an important role in deciding on the characters used was played by two individuals, Larry Breed and Jim Ryan. Larry Breed was from STSC, a company that made and sold an APL interpreter, STSC*APL. Jim Ryan was from Burroughs, but he also had worked at Tektronix on the development of a version of their storage-tube graphics terminals with an APL keyboard feature added.
The Backspace and Enter keys are displaced by the arrangement of printable character keys shown; they return to their traditional 88-character electric typewriter positions with the arrangement found on the 101-key keyboard for the IBM Personal Computer. Unlike some others, as a touch-typist, I felt that IBM had finally gotten it right on their third try.
Incidentally, here is the same keyboard arrangement as it would appear in association with the bit-pairing keyboard arrangement.
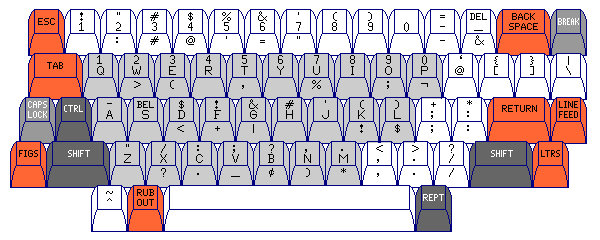
Keyboards used on ASCII terminals originally were designed so that the least significant bits of both characters on the key were the same; such terminals were called bit-pairing keyboards. The positions of characters in ASCII were chosen so that this arrangement would have some resemblance to that of characters on a manual typewriter.
Again, a code chart is also provided.
The original Model 38 Teletype which supported APL differed from the bit-pairing keyboard above:
This diagram follows the same arrangement as the diagram above for the APL keys, which does not correspond to the actual layout of the Model 38 keyboard. There are a number of subtle changes in how the special characters are paired to APL symbols; note that the two braces are switched on the key that has them.
One difference between Model 38 APL and normal bit-pairing APL, however, was anything but subtle, but the diagram is not suited to showing it at all, although it is clearly visible on the following code chart. On the normal bit-pairing and typewriter-pairing keyboards, the keyboard operated normally when not used for APL; it generated the codes one would expect from the various keys. The Model 38 Teletype with the APL feature shown here, however, generated the codes for upper-case letters when the letter keys were not shifted, and the codes for lower-case letters when the letter keys were shifted for the special APL characters.
This was intended to increase conformance with the ASCII standard character set; and since it was not an easy matter to swap in a different typewheel on a Model 38, the fact that this prevented switching in that manner from APL operation to conventional operation was not viewed as a serious consideration.
Although this approach was largely rejected, mainframe computers, at least in academic settings, might well have to support six different types of APL terminals: the 3277 display station, the 2741 printing terminal in both PTTC/EBCD and Correspondence code arrangements, ASCII terminals using the conventional bit-pairing and typewriter-pairing correspondences, and the Model 38 with its modified take on bit-pairing APL.
The diagram below illustrates the history that led to two different kinds of ASCII keyboard:
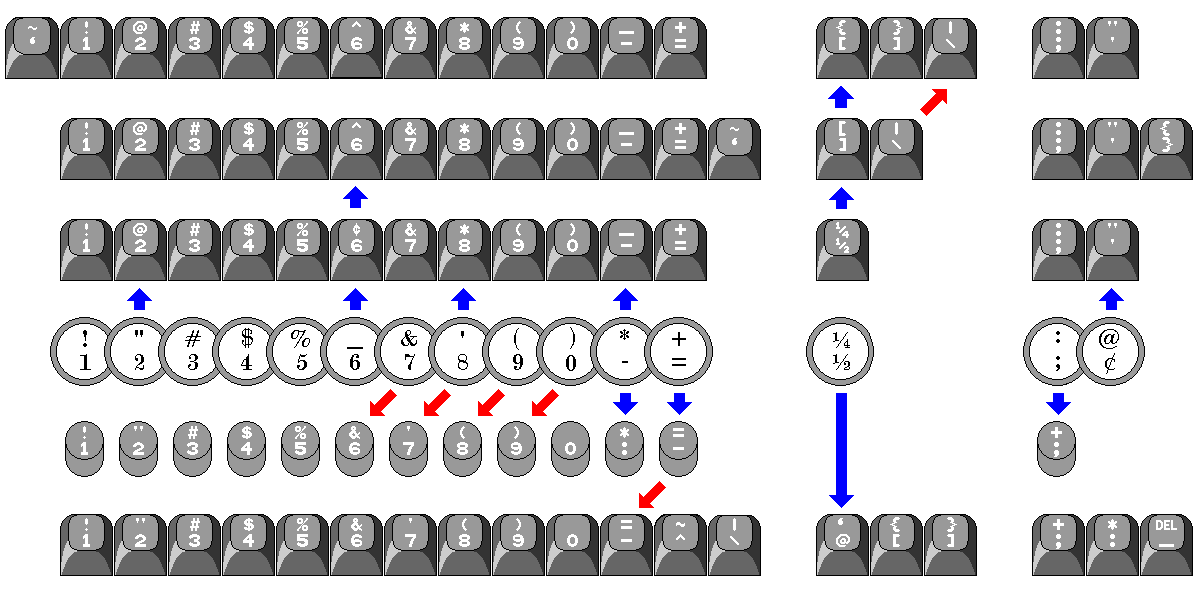
The fourth row of keys shows how many of the special characters, particularly those above the numbers, were arranged on a manual typewriter.
When electric typewriters were invented, since the force with which the key hit the paper was provided mechanically, to simplify ensuring that smaller characters such as some punctuation marks struck the paper with a lighter force, such characters were grouped together on the same key, so that it would not be necessary to change a key from light force to full force depending on whether or not shifted characters were being printed.
Thus, the key that used to contain @ and ¢ instead became the " and ' key, and the underscore replaced the asterisk as the shift of the hyphen, as well as the changes shown moving from the manual typewriter arrangement to the electric typewriter arrangement, as shown in the next row above, the third row, on the diagram.
This particular keyboard arrangement was present on the Remington Electric typewriter of 1925, and, as far as I currently know, this is where it originated; this typewriter was the first commercial model of electric typewriter in the direct line of development that led to both IBM typebar electric typewriters and the Flexowriter and Justowriter. The modern rotating cylinder drive principle of electric typebar typewriters did originate earlier, on the Mercedes Elektra typewriter, and was also used on the Woodstock Electric. There were considerably earlier electric typewriters, however, but I do not know how, or if, this issue was addressed with them. It would presumably have been difficult to do so on the Blickensderfer Electric of 1902, as that had a three-bank keyboard.
The original ASCII terminal was, of course, the mechanical Teletype model 33. The characters in ASCII were allocated so that their codes would make it easy to give the keyboard of a mechanical teletypewriter an arrangement of characters which would have some resemblance to that of a typewriter. Arranging the codes for ( and ) in a logical manner, and giving both the digit zero and the space codes which ended in four zero bits imposed some limitations that led to the last few special characters being moved left by one key. The manual typewriter, rather than the electric one, was used as a basis, and the changes can be seen going from the second row, with the manual typewriter arrangement, to the fifth row with the bit-pairing arrangement.
Other developments are also shown in the diagram. Going down from the fifth row to the sixth row, we see the changes that were made in going from the teleprinter keyboard to the bit-pairing electronic keyboard which also included lowercae. Going up from the third row to the second row, we see the changes made in going from the electric typewriter to the original typewriter-pairing arrangement, and then going from the second row to the top row, we see the additional changes that took place between that arrangement and the current one on the PC.
Later on, when electronic terminals could easily be given a keyboard arrangement that matched that of a typewriter as closely as possible, the electric typewriter had become more common than the manual typewriter, so it was chosen as the model.
The standard for the bit-pairing keyboard provided for placing the underscore above the zero as its shift, and this would have preserved the full APL keyboard arrangement, but this was uncommon in practice.
For a while, even when the technology used to implement a terminal would have allowed a typewriter-pairing keyboard to be used, it appears to have been felt that either a bit-pairing keyboard was more standard or was preferable for use by programmers. Thus, the HP 2645 terminal, which was initially sold in 1975, and which was microprocessor-based, had this keyboard arrangement:
It was a very sophisticated terminal, allowing protected fields and block mode data transfer, and it could include a pair of cartridge tape drives.
One could obtain a line-drawing character set for it, for use with forms, a set of characters that allowed very large characters to be built up on the screen, or a set of characters designed for producing mathematical equations.
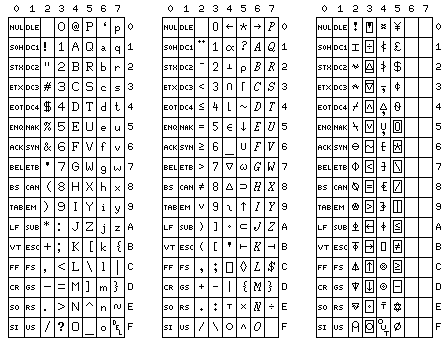
For APL, it was necessary to purchase the 2641 terminal, which included the APL character set as a 128-character block including the bit-pairing APL-ASCII equivalents of the regular 94 printable characters, and a second 64-character block with overstruck characters. This meant that only one of the other optional character sets, which required one 64-character block each, could be added to the terminal. A later addition to the series, the 2648, allowed dot-addressable graphics to be drawn on the screen.
The character set of the HP 2641A terminal appears to be as illustrated below:
 or
or
The first section of the diagram shows ordinary ASCII characters, and the terminal could also operate as a normal ASCII terminal; the second shows APL characters that are not overstruck, according to the bit-pairing arrangement; and the third shows the overstruck characters the terminal could handle.
However, my source for this information was imperfect, and so you can compare two different attempts I made to reconstruct the character set from it.
Some explanation of the discrepancies between the two attempts might be in order. When making the second image, the source I was using showed the character at C0 as blank, with no basis for inserting the corresponding character in the first attempt. The character at D5, on the other hand, was an overstrike involving the quad character, as in the first attempt, but in addition to the quad character, there seemed to be a multiple overstrike present. As for the character at FE, the source I used in creating the second version showed both the overstrike shown there and, in what may have been for an older version of the terminal, the overstrike appearing in the first chart. As for the character at CF, the difference is merely because I chose two different conventions to represent it; the first diagram shows an approximation of the actual screen appearance of that character on a 2641A, the second diagram shows the intended character as it would appear on a 2741 terminal: the overstrike of O, U, and T for the purpose of interrupting a running program.
Like many video terminals that supported APL, and also dot matrix printers, the letters of the alphabet in APL were not in fact italicized, as I show them here following the convention estabished for the language by the IBM 2741 terminal.
Although I was somewhat shocked and dismayed that an elaborate terminal like the HP 2645 would have a bit-pairing keyboard, the keyboard that, when I first saw it in the dealer area at a computer society conference, shocked me because it seemed incredible that such a large and elaborate keyboard would resort to a bit-pairing layout as a cost-saving measure, was that of the UTS 400 terminal from Univac:
However, I may have been somewhat unfair, as the reason may have been to seek compatibility with earlier terminals of theirs.
The original typewriter-pairing keyboard layout for ASCII followed more closely the arrangement of characters on a typewriter, but in this case an electric typewriter. (It was because the quote marks, having a small area, should hit the paper with less force, that they were taken away from sharing keys with two digits, and were placed both on the same key in the electric typewriter.) The APL characters could be used with both a bit-pairing and a typewriter-pairing keyboard; the assignment would produce the same arrangement of APL characters if the underscore were the shift of the zero key. This did not often happen in practice, and was disparaged in the standards. One of the most notable uses of an APL terminal with the bit-pairing arrangement was an APL version of the Teletype Model 37, but at the time, many computers and terminals had bit-pairing keyboards.
An illustration of an APL keyboard in the second edition of APL, an interactive approach by Gilman and Rose shows a diagram based on one from an IBM manual for APL\360, but including three additional keys for the added characters on an ASCII terminal with the APL character set. This diagram shows the open right brace in the shifted position. This would result in the two braces in APL being equivalent to the braces of the opposite type in normal ASCII. On the other hand, the paper by Laurence M. Breed in which the APL-ASCII standard was originally presented gives left brace as occupying the unshifted position; however, left brace is only named, not illustrated, so I was not able to be absolutely certain that left brace meant the opening brace. I was finally able to obtain a definitive resolution of this question, after failing to find images of keyboards of this type at sufficient resolution to settle the question, from a manual for a Decwriter III terminal (this terminal already had an otherwise typewriter-pairing keyboard with the braces and square brackets in the bit-pairing arrangement, like the IBM PC keyboard) which showed the ASCII codes for the various APL characters. This accords with one image of an APL keyboard I had found which, although not clear enough to show which way the braces were, showed that the key with the braces did not have ASCII characters on the front part, the other keys having the ASCII characters present where they disagreed with the APL characters in the same positions.
As well, after seeing the braces reversed on the Model 38 Teletype, I confirmed that they were not reversed on the normal bit-pairing keyboard from a manual for the Datamedia Elite 1520 terminal.
The two tack characters were easier to distinguish on numerous images of APL-ASCII keyboards. In the paper which originally defined the APL-ASCII keyboard arrangement, the unshifted character is referred to as left tack, and the shifted character is referred to as right tack. As it happens, this convention of naming is now known as the Bosworth convention, and the reverse assignment of names, known as the London convention, is now more common. Under the London convention, shift-B is known as "up tack", and shift-N is known as "down tack". Personally, while I am opposed to using anything but the original names for "left tack" and "right tack", since as soon as a different set of names is used, confusion can arise, I also admit that the London convention clearly makes more sense for "up tack" and "down tack". Thus, rather than preferring the Bosworth convention, my preference is: use the Bosworth convention for "left tack" and "right tack", and, as for the other two characters, always call them "encode" and "decode", and never use the terms "up tack" and "down tack" at all. In APL documentation from IBM, where a name for the symbols based on their graphical appearance, instead of their function in APL, is used, shift-B is called "base", and shift-N is called "top".
On the IBM 1130 computer, the console typewriter had a keyboard which was arranged like that on a keypunch rather than like that on an IBM 2741 terminal. On some small-scale IBM 1130 systems, it had been desirable to provide the ability to use APL from the console typewriter and not just from terminals connected to the computer. In order to permit this, an ingenious keyboard arrangement was devised at IBM:
Three additional keys on the console keyboard were available for use as part of the APL keyboard. The regular shift keys were ignored, and two of the normal character keys were used to shift in either a counterclockwise or a clockwise direction through the three possible shift states. Some of the more common overstruck characters, but not all the possible overstrikes, were provided as single characters on the keyboard.
I have since learned that it was one Charles Brenner who implemented this keyboard for APL on the IBM 1130.
One popular line of terminals that printed on thermal paper also came in a model that used 5-level code. It used a bit-pairing keyboard, as in those days logic gates were still relatively expensive, and so it was hardly surprising that if you wanted to use 5-level code, you had to buy another terminal, as opposed to this just being a switchable feature.
But this inspired me to think of this kind of keyboard:
that could be used on equipment that was switchable between ASCII and 5-level code and EBCDIC.
One starts with a conventional ASCII bit-pairing keyboard. But the letter keys are light gray, to distinguish them, and have on them the set of figures shift characters for 5-level code, only for use when the terminal is in this mode.
Then, on the front of the keys, are characters for use with EBCDIC. Because of the different structure of this code, a different bit is chosen to be the one inverted by the shift key. This arrangement is inspired by a modified Model 35 Teletype I saw in use as a console typewriter with an SDS 930 computer in my days as a student. The BCDIC characters rather than the EBCDIC characters were on the keyboard (so some of the rather unusual characters you might associate with the IBM 1401 were there), and not all the possible shifts were present; thus, period, comma, and some other characters had their own keys and so weren't available as shifts of other keys as well.
Manual typewriter:
!   "   #   $   %   _   &   '   (   )   *   +
1   2   3   4   5   6   7   8   9   0   -   =
                                          ¼
  Q   W   E   R   T   Y   U   I   O   P   ½
                                       :   @
   A   S   D   F   G   H   J   K   L   ;   ¢
                                         ?
     Z   X   C   V   B   N   M   ,   .   /
Electric typewriter:
!   @   #   $   %   ¢   &   *   (   )   _   +
1   2   3   4   5   6   7   8   9   0   -   =
                                          ¼
  Q   W   E   R   T   Y   U   I   O   P   ½
                                       :   "
   A   S   D   F   G   H   J   K   L   ;   '
                                         ?
     Z   X   C   V   B   N   M   ,   .   /
Uppercase bit-pairing ASCII:
!   "   #   $   %   &   '   (   )       *   =
1   2   3   4   5   6   7   8   9   0   :   -
                                  _   @
  Q   W   E   R   T   Y   U   I   O   P
                               [   \   +
   A   S   D   F   G   H   J   K   L   ;
                         ^   ]   <   >   ?
     Z   X   C   V   B   N   M   ,   .   /
Upper- and lower- case bit-pairing ASCII:
!   "   #   $   %   &   '   (   )       =   ~   |
1   2   3   4   5   6   7   8   9   0   -   ^   /
                                          `   {
  Q   W   E   R   T   Y   U   I   O   P   @   [   _
                                       +   *   }
   A   S   D   F   G   H   J   K   L   ;   :   ]
                                 <   >   ?
     Z   X   C   V   B   N   M   ,   .   /
Typewriter-pairing ASCII (original form):
!   @   #   $   %   ^   &   *   (   )   _   +   ~
1   2   3   4   5   6   7   8   9   0   -   =   `
                                          ]   |
  Q   W   E   R   T   Y   U   I   O   P   [   \
                                       :   "   }
   A   S   D   F   G   H   J   K   L   ;   '   {
                                 <   >   ?
     Z   X   C   V   B   N   M   ,   .   /
IBM 2741 terminal:
=   <   ;   :   %   '   >   *   (   )   _   +
1   2   3   4   5   6   7   8   9   0   -   &
                                          ¢
  Q   W   E   R   T   Y   U   I   O   P   @
                                       !   "
   A   S   D   F   G   H   J   K   L   $   #
                                 |   ¬   ?
     Z   X   C   V   B   N   M   ,   .   /
Keypunch
    #   ,   $   .               0
    @   %   *   <           -   /
  +   _   )   ¢  082  |   1   2   3   &
  Q   W   E   R   T   Y   U   I   O   P
       >   :   ;   ¬   '   4   5   6
   A   S   D   F   G   H   J   K   L
         ?   "   =   !   (   7   8   9
     Z   X   C   V   B   N   M   ,   .
Keyboard for 5-level code (US version):
  1   2   3   4   5   6   7   8   9   0
  Q   W   E   R   T   Y   U   I   O   P
   -  BEL  $   !   &   #   '   (   )
   A   S   D   F   G   H   J   K   L
     "   /   :   ;   ?   ,   .
     Z   X   C   V   B   N   M
Three-bank manual typewriter keyboard:
  1   2   3   4   5   6   7   8   9   0
  Q   W   E   R   T   Y   U   I   O   P
   @   $   %   !   _   *   /   -   #
   A   S   D   F   G   H   J   K   L
     (   )   ?   '   "   :   ;   &
     Z   X   C   V   B   N   M   ,   .
Note that the original version of the lower-case bit-pairing keyboard is also shown; many lower-case bit-pairing keyboards had the {[ and }] keys next to each other horizontally as on the modern modified typewriter-pairing arrangement on the IBM PC (and the DECwriter III and the VT 100), but the arrangement shown is the one that can be matched up to the APL keyboard image above. I had thought that it was the VT 100 terminal,
from 1978, that introduced this modification to ASCII keyboards that were designed to be like a typewriter. The previous VT52 terminal
had a standard, conventional typewriter-pairing keyboard.
One of the most common and familiar terminals with the original typewriter-pairing keyboard, used with many computer systems from manufacturers other than the Digital Equipment Corporation, was another one of their terminals, the dot-matrix printing terminal that was the DECwriter II, LA36:
The numeric keypad, shown here, was an extra-cost option. Not included in the diagram are a cluster of eight keys to the left to select transmission modes, the baud rate, and so on.
Another classic typewriter-pairing keyboard that was quite similar over much of its extent is that of the H89 computer from Heathkit:
This change became popular quickly; thus, the award-winning HP 300 computer, from 1979, incorporated it:
However, I have since learned that HP was there first; the HP 9845A calculator, from 1977, had a keyboard with a generally typewriter-like layout, but with the braces and square brackets arranged in the bit-pairing fashion.
Some ASCII keyboards, usually bit-pairing ones, included the control characters on the keys. In the case of keyboards including lower-case, they looked something like this diagram shows:
That diagram of a bit-pairing keyboard, though, shows the backspace and return keys in their correct touch-typing positions, just as they were on the U.S. layout of the Model M keyboard for the IBM PC. That is something that, as far as I know, never actually happened on any ASCII bit-pairing keyboards with lower case back in the day, unfortunately.
Of course, if I was the one designing keyboards back then, bit-pairing keyboards would have looked like this:
And also of course, I would prefer typewriter-pairing keyboards to bit-pairing ones, and they too would be designed so as to offer the back space and carriage return keys in their traditional size and position:

On the other hand, this diagram shows, more or less, what upper-case only bit-pairing keyboards actually did look like:
Incidentally, this diagram:
illustrates both that the IBM PC keyboard would have to be changed slightly if the PC were a typewriter, and why the columns of keys in the main area of a typewriter or computer keyboard are slanted in just the way they are, with two rows of keys placed, like bricks, so that keys in one row are centred where the boundary between two keys in the other row is located, and these two groups of two rows are then offset by one-quarter of the width of a key. This lets the centers of the keys be distinct, each separated from the closest other one by 3/16 of an inch. To fit the space bar in, the levers leading to some keys are then placed halfway between these levers, so they are on odd centers, with a spacing of 3/32 of an inch. The tabulator, on an office manual typewriter, would, like the space bar, be supported by two levers.
For a bit more about how dimensions relate to each other in a keyboard, for the keyboard illustrated in this diagram:

this diagram
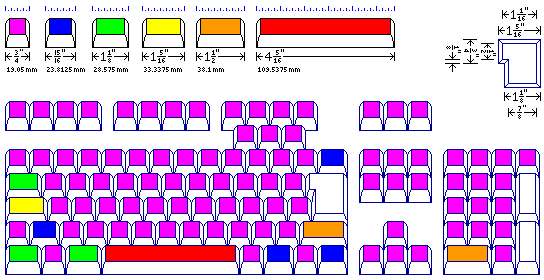
shows the widths of the various keys in that keyboard.

Also, this next diagram illustrates a consideration of something that was once a characteristic of all but the cheapest computer keyboards, but which has now fallen into disuse, is shown: so that the keyboard can be tilted upwards, and yet the thrust on the keys still point straight downwards, one would have to increase the space between rows of keys on the printed circuit board. At first, a Pythagorean triple that could yield a slope of about 12.68 degrees and give an exact decimal multiple of the millimeter as the spacing of rows of keys on the printed circuit board was considered; however, as the height of the triangle doesn't have to be rational, the fact that one inch is 2.54 centimeters was put to use to allow a slope of 10.1 degrees, closer to what I felt desirable, with a spacing of rows of keys on the printed circuit board of 19.35 mm, as contrasted with the basic key spacing of 19.05 mm or three-quarters of an inch. An alternative Pythagorean triple is also possible, giving a slope of about 10.39 degrees.
And finally, a mathematical brute-force method let me find a Pythagorean triple that gives a slope of about 9.94 degrees, for an even closer approach to the desired angle of ten degrees.