The Enigma had a stack of three or four normal rotors, not in principle unlike those in a Hebern machine. They had 26 contacts in a circle on each side, those on one side were connected in a scrambled order to those on the other, and the rotors moved to vary their effects on the alphabet.
There was a mechanical difference: the rotors had plain contacts on one side, and spring-loaded contacts on the other. A Hebern machine had only plain contacts on its rotors, and the machine itself therefore needed twice as many spring-loaded contacts as a permanent part of the machine. This cut total costs for an Enigma, but it meant that rotors were more expensive, and indeed during the war, the German forces kept on using their old rotors, only gradually adding the odd new one to the set.
In addition to the contacts and the wires between them, a rotor often has two other parts of significance to the cipher it will generate which are often overlooked. Like the wheels in an odometer or a mechanical adding machine, rotors in some rotor machines include what is essentially a gear with one tooth to cause the next rotor to move one position forwards at one point in its own rotation. Some rotor machines, of course, use completely different principles to move the rotors; the Hebern machine did use this principle, but still kept that part of the gearing physically separate from the rotor itself. Also, the rotor has to be labelled, so that there is some way of recording and communicating the starting position in which the rotors of a rotor machine are to be set. Otherwise, the two parties to a communication will be unable to set up their machines the same way. On the Hebern machine, the rotor itself was marked.
In the Enigma, a movable alphabet ring was labelled with the letters identifying rotor positions. The rotor itself, of course, was marked so that alphabet ring settings could be written down too. The ratchet wheel, which determined when one rotor would cause the next slower one to advance, was attached to the alphabet ring. This is quite important to note, as it determined how methods of exploiting the Enigma's indicator method would work, and how the Bombe had to be designed.
But the main distinguishing feature of the Enigma was its reflecting rotor. Instead of plaintext going in one end with ciphertext coming out the other, the reflecting rotor, with the 26 contacts on one side connected to each other in a scrambled fashion, caused the electrical signal to go through the rotors a second time in the opposite direction, coming out on the same side it came in, but at a different contact.
This meant two contacts on the entrance side of the rotor stack were "live". Instead, therefore, of the switch operated by a typewriter key on the Enigma merely connecting the battery to the proper contact of the outermost rotor, it instead took the contact of that rotor, and disconnected it from the lamp under the same letter as well as connecting it to the battery.
As an extra security feature, the Enigmas used by German forces during World War II included a plugboard. The wires leading from the lamps and keyboard to the rotors were all cut, and then wired to a socket that acted like the socket for a phone plug. If nothing was plugged in, the two wires to the plug were connected together. If a plug was inserted, the two wires were not connected to each other, instead, each one was connected to one of the two contact points in the plug.
Although a commercial Enigma, modified by Polish cryptanalysts to match a military Enigma, used phone plugs, the plugs in the plugboard of the actual Enigma had two prongs, but they still functioned electrically in the same way as phone plugs.
So, think of 26 phone plug sockets, and a set of ten wires, with a phone plug at each end, with the tip at one end wired to the shaft at the other end, and you will have an accurate electrical picture of the plugboard of the Enigma.
An attempt at a diagram of the Enigma in ASCII graphics:
                   |           |           |
  -----  ----------| ----------| ----------|
 |   --||-    -----||----------||-        -|------
 |  /  || \  /     ||          || \      / |      |
 | |  -||--\-   ---||-     ----||- \  --/--|----- |
 | | / ||   \  /   || \   /    || \ \| /   |     ||
 | || -||-   ------||-----  ---||--\-\-  _-|---- ||
 | ||| || \  /     ||   \  /   || _-\|\--  |    |||
 |  ---||----   ---||------   -||-   \ ----|--- |||
 |  || ||   \  /   ||     \  / ||    |\    |   ||||
 |  | -||------  _-||--_   ----||--_ | ----|-- ||||
 |  |  ||  _--\--  ||   ---/-_ ||   -|--_  |  |||||
 |   --||--    ----||------   -||----    --|- |||||
  -----  ----------| ----------| ----------| ||||||
              Slow |    Medium |      Fast | ||||||
                                             ||||||
   ----------------------------              ||||||
  |        |   |   |   |   |   |             ||||||
  -        |   |   |   |   |   |             ||||||
 ---      ( ) (*) ( ) ( ) ( ) ( ) Lamps      ||||||
  -        |   |   |   |   |   |             ||||||
 ---       |   |   |   |   |   |             ||||||
  |        |   |   |   |   |   |             ||||||
   --------|---|---|---|---|---|-            ||||||
           | | | | | | | | | | | |           ||||||
           I   I    /  I   I   I   Keyboard  ||||||
           |   |   |   |   |   |             ||||||
           |   |   |   |   |   |             ||||||
           |_ _|   |   |   |   |             ||||||
            _X_    I   I   I   I   Plugboard ||||||
           |   |   |   |   |   |             ||||||
           |   |   |   |   |    ------------- |||||
           |   |   |   |    ------------------ ||||
           |   |   |    ----------------------- |||
           |   |    ---------------------------- ||
           |    --------------------------------- |
            --------------------------------------
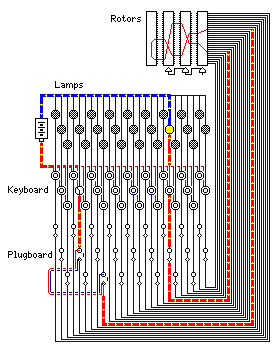
And here is a similar diagram in graphic form:

To make it simple to understand the principle which allows pressing a key on the Enigma to light the lamp to which the key is connected through the rotors, but not the lamp connected to the key itself, the wires have been colored red and blue, depending on whether they are at a positive or negative potential (I've chosen the battery orientation in the diagram arbitrarily for clarity, and do not claim it matches that of the actual Enigma) and wires carrying current are shown in a lighter red or blue, and, where convenient, are shown thicker, with little yellow arrowheads showing the direction of current.
The Germans themselves broke messages transmitted by Republican forces during the Spanish Civil War on conventional Enigma machines without plugboards. And it was the plugboard, more than anything else, that convinced them that the Enigma was unbreakable.
The rotor wirings of the Naval Enigma, most of which were also used by the Wehrmacht, were:
Initial input contact:
         A B C D E F G H I J K L M N O P Q R S T U V W X Y Z

Output contact from rotor #:                                 In window
                                                             for "carry":
     I : E K M F L G D Q V Z N T O W Y H X U S P A I B R C J  Q
    II : A J D K S I R U X B L H W T M C Q G Z N P Y F V O E  E
   III : B D F H J L C P R T X V Z N Y E I W G A K M U S Q O  V
    IV : E S O V P Z J A Y Q U I R H X L N F T G K D C M W B  J
     V : V Z B R G I T Y U P S D N H L X A W M J Q O F E C K  Z
*   VI : J P G V O U M F Y Q B E N H Z R D K A S X L I C T W  MZ
*  VII : N Z J H G R C X M Y S W B O U F A I V L P E K Q D T  MZ
* VIII : F K Q H T L X O C B J S P D Z R A M E W N I U Y G V  MZ

Thick reflecting rotors:
    B : Y R U H Q S L D P X N G O K M I E B F Z C W V J A T
    C : F V P J I A O Y E D R Z X W G C T K U Q S B N M H L

Extra ("Greek") rotors inserted before thin reflecting rotors:
*  Beta: L E Y J V C N I X W P B Q M D R T A K Z G F U H O S
* Gamma: F S O K A N U E R H M B T I Y C W L Q P Z X V G J D

Thin reflecting rotors:
*    B : E N K Q A U Y W J I C O P B L M D X Z V F T H R G S
*    C : R D O B J N T K V E H M L F C W Z A X G Y I P S U Q
The first five regular rotors, and the two reflecting rotors above were used in both the Wehrmacht and the Navy. Only the Navy used the last three regular rotors, numbers 6 through 8, and two thin rotors, one reflecting, to replace the reflecting rotor. The rotors only used in the Naval Enigma are marked with an asterisk.
Each rotor, other than the reflecting rotor, is described this way: the line at the top with the letters in order from A to Z indicates the contact which is on the side of the rotor facing the wires from the keyboard and lamps, and the table entry indicates the contact on the side facing the reflecting rotor connected to that contact, when the alphabet ring is in the A position, and A is the letter showing through the window at the top of the machine.
While this form of the Enigma was used by the Wehrmacht, and by the Navy with improvements, other forms of the Enigma were used during the war by other military and governmental organizations within Nazi Germany.
One of the most famous is the Abwehr Enigma, which used rotors with 11, 15, or 17 notches, but which had no plugboard. Its keyboard had numerals and punctuation marks on the keys above the letters. The Mil Amt, which succeeded the Abwehr, used a machine with a set of six rotors, all with nine notches.
The Railway Enigma was an Enigma with a typewriter keyboard entrance permutation, like the commercial Enigma C and Enigma D.
Although the Army and Navy continued to use their original rotors throughout the war, each of the other groups using Enigmas used their own rotor wirings. This was a natural security precaution. Probably the reason that other Enigma machines used did not have plugboards is also because security kept groups using Enigma machines from knowing about the Enigmas used by other groups: it may well be that the different Enigmas were made in separate factories. However, the Mil Amt seems to have learned the same lesson as was used in the Naval Enigma, by switching to rotors all having the same notches.
Next
Chapter Start
Skip to Next Section
Table of Contents
Main Page