This page shows the moves of a chess game, with a diagram for every move, to make it easy to read even without a chess board handy to play the game.
Although I must admit that I am hardly qualified to comment too instructively on the moves, studying annotated master games is indeed one popular method for learning about Chess. The game I have chosen is one considered to be perhaps the most entertaining game of chess ever played. It is the game played on June 21, 1851 in the Divan in London between Adolf Anderssen and Lionel Kieseritzky, termed the "Immortal Game". This game was played informally, not as part of a match or tournament.
Adolf Andersson was a mathematics teacher by profession, who lived and taught in the city in which he was born, then known as Breslau, and now known as Wroclaw and now part of Poland. He began as a composer of chess problems, but then went on to play chess in earnest, and had a highly successful record against the other masters of his day. He was, however, defeated by Morphy in a historic match. He was universally well-liked.
Lionel Kieseritzky was also a mathematics teacher, from what is now known as Tartu and is now within Estonia. His chess career was more successful than might appear from the fact that his best-remembered game is one he lost.
Incidentally, an excellent article on this game was recently published in the third issue of the American Chess Journal, I have discovered. I am far from attempting to compete with such an article; this page deals with this game from a very elementary standpoint. No knowledge of chess is assumed; even the basic rules are explained in the course of the game. (This however does mean that if one doesn't know the rules of Chess, one really will have to read the account of the game below twice to know what is going on. Assuming, of course, it was even worth reading once.)
In researching more information about this game, I have found some public-domain works which contain not just its score, but annotations. I have added quotes from them so that it might be possible to find here some competent notes on this game after all.
I have made some minor editorial changes to the quoted notes for such purposes as modernization of language and consistency of notation from their original wording.
However, these notes are associated with scores of the game that have some differences in move order, and thus, in a few cases, the notes are applied to a different position than the one given here, and as a result they may be inaccurate due to this, and not due to any mistake by their original authors.
Incidentally, I found a score in algebraic notation of this game on the Web which differs from most other accounts at Black's third move, making the game an example of the Bryan Counter Gambit.
I originally assumed this was an error, and presumably the game, as actually played, transposed into a position from that opening. (Many positions in the opening game in Chess can be reached by the same moves played in more than one order; they are listed under the order of moves which is most common, and when a position is reached by a different order of moves, it is said to have transposed to a position belonging to the opening under which that position is listed from the opening actually played.)
Since then, however, I have found both the original publication of the game by Kieseritzky himself, and the early publication of this game in the Wiener Schachzeitung which gave it its appellation of "The Immortal Game" (in German, as "Die Unsterbliche Partie"), which notes the fact that Kieseritzky actually resigned on move 20, and that score differs from the one usually seen at the third move as well.
That score, almost exactly as notated in these two sources, is (except using English letters for the pieces in the second case, and substituting for certain special symbols in the first case):
La Régence               Wiener Schachzeitung

 1. e 45     e 55         1.   e2 e4          e7 e5
 2. f 46     e 46-f       2.   f2 f4          e5 f4:
 3. F 43     D 48x        3. B f1 c4        Q d8 h4 +
 4. E 16     b 52         4. K e1 f1          b7 b5
 5. F 52-b   G 66         5. B c4 b5:       N g8 f6
 6. G 36     D 68         6. N g1 f3        Q h4 h6
 7. d 34     G 58         7.   d2 d3        N f6 h5
 8. G 48     D 57         8. N f3 h4        Q h6 g5
 9. G 56     c 63         9. N h4 f5          c7 c6
10. g 47     G 66        10.   g2 g4        N h5 f6
11. H 17     c 52-F      11. R h1 g1          c6 b5:
12. h 48     D 67        12.   h2 h4        Q g5 g6
13. h 58     D 57        13.   h4 h5        Q g6 g5
14. D 36     G 87        14. Q d1 f3        N f6 g8
15. C 46-e   D 66        15. B c1 f4:       Q g5 f6
16. B 33     F 53        16. N b1 c3        B f8 c5
17. B 54     D 22-b      17. N c3 d5        Q f6 b2:
18. C 64     F 17-H      18. B f4 d6        B c5 g1:
19. e 55     D 11-Ax     19.   e4 e5        Q b2 a1:+
20. E 25     ---         20. K f1 e1        N b8 a6
For the Wiener Schachzeitung score, the name of the piece is followed by the square from and then the square to in today's algebraic notation. + indicates check, and : after a move indicates that it was a capture.
And this differs in another way from what I had just believed I had learned as historically accurate: Kieseritzky still makes a move on move 20 instead of resigning then - according to the score in the Wiener Schachzeitung, although not in the original move. However, no move 21 is shown for Andersson as having taken place in actual play, so Kieseritzky may have moved and then immediately resigned, or at least resigned on his opponent's turn.
The changes in move order that lead to the form of the game as usually anthologized appear in 1852, the year after the game was played, in the book Horae Divanianae by Elijah Williams, in which this was the last game (of 150 games) included.
Earlier, the changes in move order found in the usual form of the game, shown below, appeared on page 2 of the July 19, 1851 issue of The Chess Player, which notes Kling and Horwitz as its editors. The moves are given up to Black's move 20 in the usual form, and then it is simply stated that White gave mate in three moves, however.
As this was only one month, less two days, after the game was actually played, it is not surprising that subsequent anthologizers of the game did not suspect error, and did not make the effort to consult earlier scores which were in algebraic notation instead of descriptive notation- and, in one case, in a particularly obscure form of algebraic notation.
Here are the moves as I now present them, and the usual score of the game that had appeared in most anthologies, side-by-side for comparison:
    Original               Usual

 1. P-K4    P-K4        1.      P-K4        P-K4
 2. P-KB4   PxP         2.      P-KB4       PxP
 3. B-B4    Q-R5+       3.      B-B4    [4] P-QN4
 4. K-B1    P-QN4       4.  [5] BxP     [3] Q-R5+
 5. BxP     N-KB3       5.  [4] K-B1        N-KB3
 6. N-KB3   Q-R3        6.      N-KB3       Q-R3
 7. P-Q3    N-R4        7.      P-Q3        N-R4
 8. N-R4    Q-N4        8.      N-R4    [9] P-QB3
 9. N-B5    P-QB3       9.      N-B5    [8] Q-N4
10. P-KN4   N-B3       10.      P-KN4       N-B3
11. R-KN1   PxB        11.      R-KN1       PxB
12. P-KR4   Q-N3       12.      P-KR4       Q-N3
13. P-R5    Q-N4       13.      P-R5        Q-N4
14. Q-B3    N-N1       14.      Q-B3        N-N1
15. BxB     Q-B3       15.      BxB         Q-B3
16. N-B3    B-B4       16.      N-B3        B-B4
17. N-Q5    QxP        17.      N-Q5        QxP
18. B-Q6    BxR        18.      B-Q6        BxR
19. P-K5    QxR+       19.      P-K5        QxR+
20. K-K2    Resigns.   20.      K-K2      * N-QR3
                       21.    * NxP+      * K-Q1
                       22.    * Q-B6+     * NxQ
                       23.    * B-K7++
The usual form appeared, for example, in Chess Brilliants, published in 1869; it appeared in the 1969 edition of The Golden Treasury of Chess; and in many other places.
In addition to showing the moves of this game in both algebraic notation and descriptive notation, they are also shown in the modified form of algebraic notation that was originated by Kieseritzky himself.
However, I have avoided the use of certain specialized graphic symbols that his notation normally used; G77-gx was actually written as something closer to G77xg, and C75xx was closer to C75#, but as those approximations are also not accurate, I went with a plainer indication of a capture that also gives check in the first case, and a move giving checkmate in the second. The page on the history of chess notation gives descriptions of the graphics used and details of the system.
BRYAN COUNTER-GAMBIT
White: Adolf Anderssen
Black: Lionel Kieseritzky
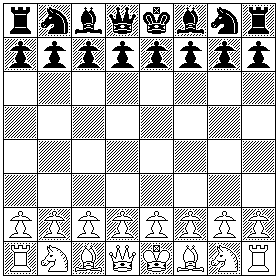
This diagram shows the arrangement of the chess pieces on the board before play begins. Applicable to all games of chess played under the current standard rules, it applies to the game we are now about to view in particular.
Each player has two rows of pieces in front of him (or her). The front row is entirely made up of pawns. The row in the back is made up of several different pieces, and is symmetrical except for the two pieces in the middle.
The pieces on the back row are, in order from left to right, Rook, Knight, Bishop, Queen, King, Bishop, Knight, Rook.
The Queen being the most powerful piece, and the King the most valuable one (its capture being almost, but not exactly, the object of the game of Chess) it makes sense that players each have only one each of these two pieces.
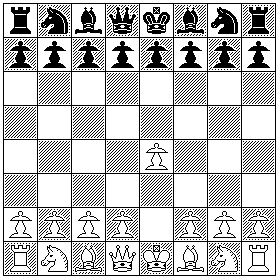
1. e4 P-K4 e45
This is, of course, a very standard opening move. Although, therefore, there is nothing to comment about in length as to what prompted Adolf Anderssen to choose this move, I can still use the opportunity to say a few general things about Chess.
A pawn normally has only one move; one space forwards. Unlike any other piece, it does not capture the same way as it moves; instead, it can capture pieces which lie one space diagonally forwards from it by moving to the square such a piece occupies.
Capturing an enemy piece with a Pawn often has a disadvantage; now two of your pawns are in the same column (or file) of the board, getting in each other's way, and leaving an open gap in the wall of pawns you had previously had. Because of this result of the way a Pawn moves, and because in addition pawns cannot move backwards, not only is it true that the way your pawns are arranged is important in a chess game, but this also defines the kind of game that chess is. This was expressed in Philidor's famous remark: "Pawns are the soul of chess".
Each Pawn, when moved for the first time, is allowed to move two spaces forwards, as well as to make its normal move of one space forwards. Because this is thought of as a 'special' move, a pawn that makes such a move when another Pawn belonging to the other player could have captured it if it had made its regular move instead can still be captured, in a special move called en passant capture. The other player's Pawn simply pretends it is capturing the pawn in the square it would have moved to with a regular move, by moving diagonally, and then the pawn, in its real place, two squares forward, is removed from the board.
This move is considered good, and has become standard, for two reasons. It is important to control the center of the chess board. This is because a chess piece in the center can generally move to more places than one on the edge, and thus it is more powerful. Also, this move lets the Bishop next to the King move out. The Knight to the bishop's right doesn't need any help to move, since the Knight's move is a direct jump from its starting square to its ending square, not requiring it to have any unoccupied intervening squares to move through.
Besides allowing the Bishop and the Knight to participate in the game, and accomplish something in defeating the opponent, moving these pieces out has another important function. The King, like the lowly pawn, has a special move called castling, by means of which it can move two squares on its first move.
When the king has not yet moved, and there are no pieces between it and the Rook on either side, the King may move two squares towards that Rook. The Rook then moves, jumps over the King, and is placed in the square the King passed through. This move helps put the King in the corner of the board, with other pieces around it, and out of danger.
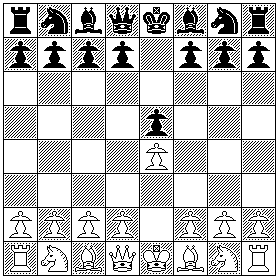
1. ... e5 ... P-K4 ... e55
Given the comments about the previous move, this is an obvious response. The black pawn is moved to a place where the white pawn can't capture it, and where it blocks that pawn's advance. Both pawns attack two empty squares in the important center of the board.
In recent years, however, the first move 1. P-K4 has become less popular, because the likely response is instead 1. ... P-QB4, the Sicilian defense. A game beginning 1. P-K4 P-K4 is recommended for beginning players, because it is an active tactical game, based on relatively simple ideas, and likely to be instructive. The Sicilian defense, however, while it does lead to games that are often tactical rather than positional in nature, leads into waters too deep for the beginner.
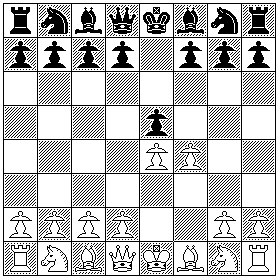
2. f4 P-KB4 f46
White has now moved a pawn into a location where Black's pawn can capture it. This doesn't mean he has made a mistake; this too is a standard opening move. The opening, so far, is called the King's Gambit. A gambit is the act of offering a piece to be captured, in a speculative fashion, in the hopes that the positional advantages of the situation after the offered capture is made will outweigh the material disadvantage.
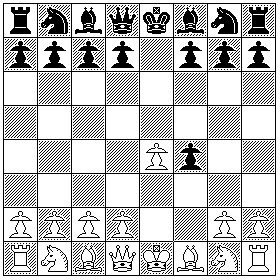
2. ... e x f4 ... P x P e46-f
Kieseritzky is clearly of the other opinion, and so the opening now belongs to the family known as the King's Gambit Accepted.
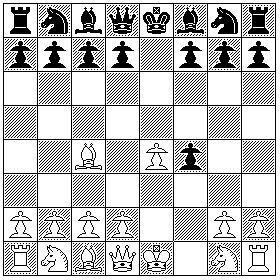
3. Bc4 B-B4 F43
This is a standard move. The Bishop is moved to the center of the board, and space is opened for castling (although with the loss of a pawn, the space on the Kingside is not as cozy for the King as it might have been). However, as we shall see, in this position, the bishop in this location is subject to annoyances; thus, the opening is now called the Bishop's Gambit. Bishops move diagonally, and this means that they always stay on the same color of square when the board is chequered; thus, losing one's first Bishop is considered worse than losing the odd Bishop that remains where other things are equal.
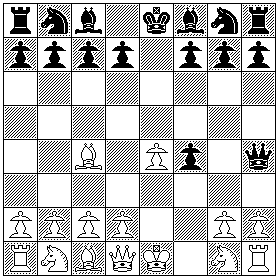
3. ... Qh4+ ... Q - R5+ ... D48x
Now that it's Black's turn to move, though, he has more exciting plans than just forcing a Bishop to waste a move. White's King is in check. It hasn't castled yet; if it moves out of the way, it will lose that privilege. The only piece that can block that check is the King's Knight's Pawn, which could move P-KN3. It would then be defended by the Rook pawn, and threaten the attacking Queen.
Of course, this would also open up the Kingside enough that castling would no longer have much point anyways.
The Queen is the most powerful piece; it moves in eight different directions, the four orthogonal and the four diagonal directions, any distance along empty squares, and one square further when there is an enemy piece to be captured. It combines the move of the Bishop, which we have already seen, and that of the Rook, which moves only orthogonally (forwards, backwards, and to the left and right).
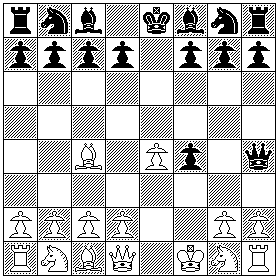
4. Kf1 K-B1 E16
Rather than forcing the Queen to retreat, White is content to let it sit on the edge of the board if it wants. The King's normal move is one square either diagonally or orthogonally.
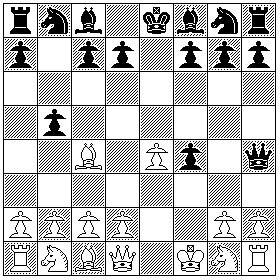
4. ... b5 ... P-QN4 ... b52
Black advances a pawn where it can capture the Bishop. It is at this point that the game's opening has become specifically the Bryan Counter-Gambit.
Ernst Falkbeer makes the following note on this move:
A move of which Mr. Kieseritzky was especially fond.
Wilhelm Steinitz makes the following note on this move:
A favorite counter-attack of Herr Kieseritzky, who adopted it with great success against some strong opponents, but it received its death-blow in the present game.
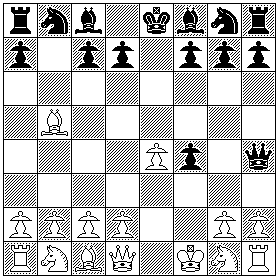
5. B x b5 B x P F52-b
But the Bishop can capture the pawn! However, the Bishop is moved closer to the edge of the board. This time, Black can move P-QB3, and this pawn, which can also capture the Bishop, is protected both by another pawn and by a Knight in that position. So the Bishop wouldn't simply be able to take it, it would have to waste a move by retreating. This might be worth the loss of a Pawn.
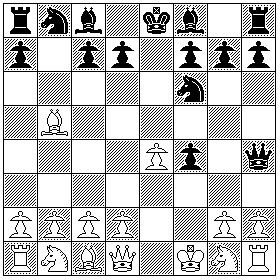
5. ... Nf6 ... N-KB3 ... G66
Black, rather than continuing the battle, makes a standard developing move.
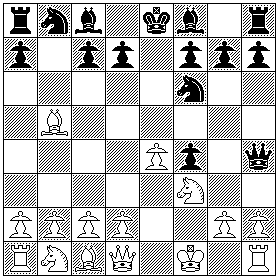
6. Nf3 N-KB3 G36
White makes the same standard developing move, but gets something extra for it; his Knight now attacks Black's Queen.
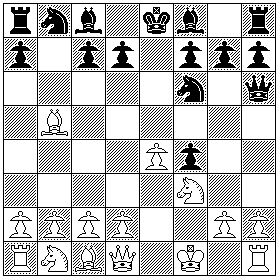
6. ... Qh6 ... Q-R3 ... D68
Thus, Black pulls the Queen back, out of harm's way, and where a pawn protects it. Of course, since the Queen is a highly valuable piece, the prospect that a piece capturing it will in turn be captured does not usually discourage an opponent from trying to capture it.
Ernst Falkbeer makes the following note on this move:
Preferable to 6. ... Qh5, which would leave the Bishop on f5 open to a violent attack.
Wilhelm Steinitz makes the following note on this move:
In other variations of this gambit the Queen is generally retreated to h5, and had this been done White could well reply Q-K2, or N-QB3; and, in the latter case, Black could not capture the e Pawn with the Knight, on account of the rejoinder Q-K2. But it formed part of Kieseritzky's system of defence in this opening to retreat the Queen to this square, in order to leave room for the Knight at h5.
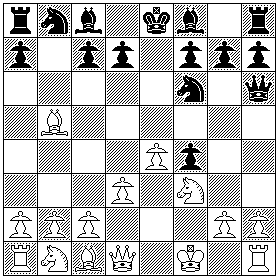
7. d3 P-Q3 d34
Now White has formed a line of three pawns diagonally, the first two defending the ones after them. This has given White dominance of the center of the board, at least for now. It has, though, blocked a line of retreat for White's Bishop. But White's other bishop now attacks a black pawn. This Pawn, though, is defended by Black's Queen, and a Bishop is more valuable than a Pawn.
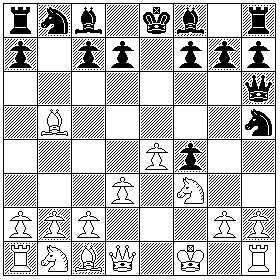
7. ... Nh5 ... N-R4 ... G58
Still, Black moves a Knight to the edge of the board to protect that pawn. In this way, Black is free to move his Queen somewhere else should it be desired.
George H. Selkirk makes the following note on this move:
Intending N-N6+, and, whether Pawn takes Knight or not, winning the exchange.
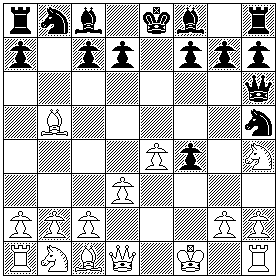
8. Nh4 N-R4 G48
White moves his Knight symmetrically.
H. F. L. Meyer makes the following note on this move:
If 8. Kf2, then 8. ... Qb6+ 9. Qb5.
Wilhelm Steinitz makes the following note on this move:
The best reply to avert the danger threatened by N-N6+: K-B2 or K-N1 would have involved the loss of a piece by Q-QN3+, and K-K1 was also inferior on obvious grounds.
Lionel Kieseritzky makes the following note on this move:
White only has two ways to save the Rook, K-K2 and N-R4, because if K-N1 is played, White's Bishop is lost with Q-N3+.
George H. Selkirk makes the following note on this move:
Averting the loss of the exchange, for if now N-N6+, White takes with Pawn, supporting the Knight; and if Black then replies with P-KN4, White moves R-KR3, with the advantage.
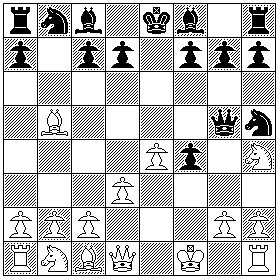
8. ... Qg5 ... Q-N4 ... D57
Black has chosen not to move his Queen very far. If there wasn't already a Pawn ready to capture the White bishop where it is standing, it would be significant that while Black wouldn't want to capture White's Knight on g5 at the cost of his Queen, should that Knight for some other reason move away from its current square, then Black's Queen could capture the white Bishop on b5. Thus, White's Knight is said to be pinned, and the pin, like the fork, is another major tactical manouver in Chess. In this case, though, White's Knight could move to two squares from which it would defend that Bishop. On one of those squares, it would even give check, as well as threatening to capture a Bishop. However, Black's other Bishop could easily capture it on that square (d6).
Note the importance of Black's having moved his Knight so that the Queen was free to move without abandoning a Pawn.
Ernst Falkbeer makes the following note on this move:
The von der Lasa Handbook recommends the following continuation at this point:
 8. ...     g6
 9. g4      Be7
10. xh5     Bxh4
11. Qg4     Qg5
12. Qxg5    Bg5
13. Nc3
and White stands better.
Lionel Kieseritzky makes the following note on this move:
This is not the correct move: playing P-KN3 is demanded here, and then White could move P-KN3 which would be responded to with B-K2.
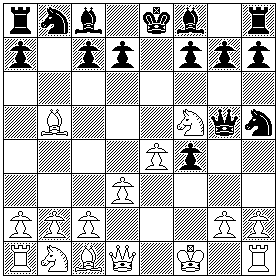
9. Nf5 N-B5 G56
White's purpose in moving his Knight in a fashion parallelling Black's preceding Knight move has now become clear. It was being advanced to threaten Black's Queen - in the position from which it has already been moved away in the actual move order of the real game. Had that been the situation, it would have been the case that, Black must deal with this, or lose a Queen while only being able to capture a Knight in return, so White's Bishop is safe for the moment.
There must be some other reason why this square is a good one for White's Knight; and, of course there is. Instead of attacking White's Queen, now it is running from White's Queen to a square on which it is defended by a Pawn. So having Black's Queen move after White's Knight makes Andersson's game look even more heroic, helping to bolster the legend of the "Immortal Game".
The Knight in this position could also capture Black's King's Knight Pawn, although that Pawn is defended by a Bishop. Since White wouldn't really want to trade a Knight for a Pawn, this move doesn't really illustrate how the tactical manoeuver called a fork operates. When a piece moves so that it can capture two other pieces, and only one of those pieces can be moved away, defended, or protected by interposition (not, of course, applicable to a Knight's attack) (that is, putting another piece in the way) this is called a fork.
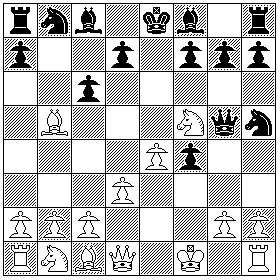
9. ... c6 ... P-QB3 ... c63
Finally, Black makes the pawn move that threatens the advanced White bishop the possibility of which we noted when commenting on White's fourth move.
Wilhelm Steinitz makes the following note on this move:
Chess students to whom this game may be new ought to pause here, and try to guess what kind of reply the great German master had in store to Black's attack on the Bishop. As regards the move adopted by Black, it seemed feasible and uncompromising enough, and it would be unjust to blame him for not discovering the opponent's grand conception, which would cover much weaker play than Kieseritzky is here guilty of. The other plausible alternative was P-KN3, but on examination it will be seen that it left the second player with an inferior game, e.g.: 9. ... P-KN3, 10. P-KR4, N-N6+. This seems best; for if the Queen retreats to B 3, White might answer N-QB3, as Black could not then take the Knight without removing the support from his own Knight; nor would it then be of much use to attack the Bishop by P-QB3, since the Bishop would retreat to Q R 4, still threatening N-Q5 in case the Queen's Pawn moved. 11. K-K1, Q-B3: if Q-R4 instead, White would also first capture the Knight and the Pawn at N 6 would soon be lost after the exchange of Queens. 12. NxN PxN 13. Q-K2, with an excellent game.
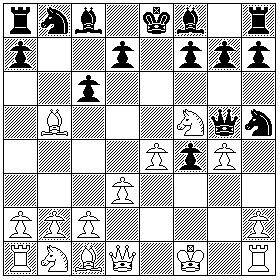
10. g4 P-KN4 g47
Now, White's Knight is defended by a second Pawn, which is in turn defended by White's Queen. Also, Black's Knight is threatened by that Pawn. Black seems to have only one move open to him.
George H. Selkirk makes the following note on this move:
Finely played, commencing a beautiful combination.
Wilhelm Steinitz makes the following note on this move:
Who would have thought of this? Depth of design and grandeur of position-judgment are marked in this magnificent sacrifice.
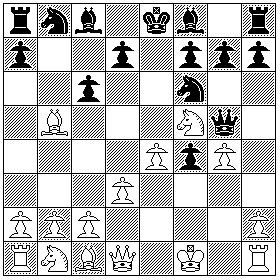
10. ... Nf6 ... N-B3 ... G66
And, indeed, Black takes that move, and saves his Knight.
Wilhelm Steinitz makes the following note on this move:
Hypercriticism might point out that P-KN3 was the only move to avoid the complications which afterwards prove too much for Black's position, albeit he gains a piece now. No doubt he had a much more comfortable retreat for his Knight at KN2 when attacked by P-KN4. But will any first-class player throw the first stone conscientiously, unbiased by the knowledge of the progress of this game? We think not; for it is not conceivable that any modern player has risen, or will rise, to the first rank without having previously studied the present masterpiece of Chess strategy. As a matter of course, Black would have had to abandon the idea of winning a piece if he had adopted the course we propose.
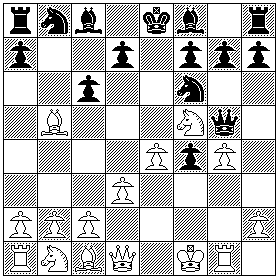
11. Rg1 R-KN1 H17
White is now moving his King's Rook to a position from which it can enter the board. As well, it is supplying a second defender to the Pawn on that file.
H. F. L. Meyer makes the following note on this move:
A magnificent move, preparing a counter-attack.
George H. Selkirk makes the following note on this move:
To protect the Pawn. The object of the sacrifice of the Bishop soon becomes apparent.
Lionel Kieseritzky makes the following note on this move:
From this moment on, White's play is superior.

11. ... P x b5 ... P x B ... c52-F
However, now that Black is no longer under immediate threat, there's that White bishop that was just sitting there to be taken (or en prise) by a Pawn.
Lionel Kieseritzky makes the following note on this move:
Instead of taking the Bishop left en prise by White, it would be better to move P-Q3 to restrict the movements of the Knight as much as possible.
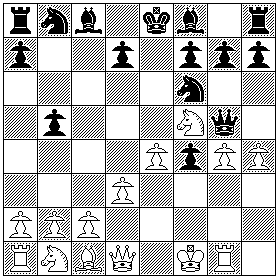
12. h4 P-KR4 h48
This move threatens Black's Queen. The Rook was moved away from where it would defend that Pawn, but it is still defended by White's Knight on g5. The Queen has only one safe square to retreat to.
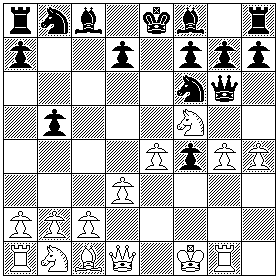
12. ... Qg6 ... Q-N3 ... D67
And so it goes there. Was all this worth the loss of a Bishop?
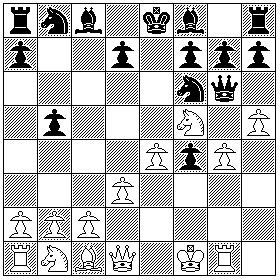
13. h5 P-R5 h58
Well, it would certainly seem that a Queen is worth a Bishop. But wait a moment, Black's Knight can still take that threatening Pawn. But it will in turn be taken by the Pawn defending it. So the exchange will be even, but at the end of it, White's Rook will be threatening the Black Queen, which must waste yet another move.
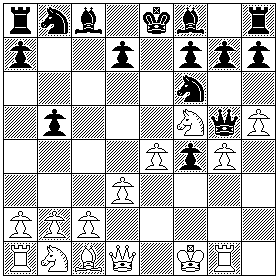
13. ... Qg5 ... Q-N4 ... D57
Except Black doesn't need to play that game. White's Pawn having moved, the square it had to leave before is now safe to return to. So White still seems to have lost a Bishop.
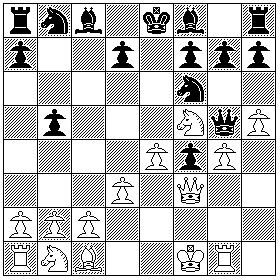
14. Qf3 Q-B3 D36
White is keeping up the pressure on the Black Queen.
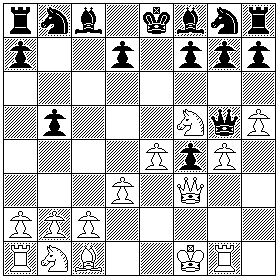
14. ... Ng8 ... N-N1 ... G87
But Black solves the problem, by moving his Knight to safety, and clearing a diagonal for the safe retreat of his Queen. Note, though, that this leaves White with a significant advantage in development; almost all of Black's pieces are where they started from, while White has both pieces and Pawns arrayed formidably in the centre of the Kingside. Since chess games don't last forever, this may well have been worth a Bishop.
H. F. L. Meyer makes the following note on this move:
White threatened 15. Bxf4; hence, the Knight had to make room for the Queen at g5.
George H. Selkirk makes the following note on this move:
To save the Queen, otherwise lost.
Wilhelm Steinitz makes the following note on this move:
Unless he gave up the piece for which he had subjected himself to such a strong attack, this and the previous move from the eleventh were all forced. That White threatened now to win the Queen by BxP is quite clear, and the Knight had to get out of the way to make room for the Queen.
Lionel Kieseritzky makes the following note on this move:
The only move to save the Queen.
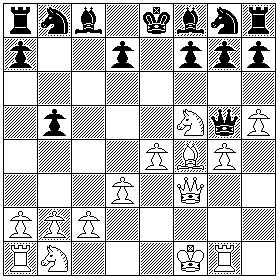
15. B x f4 B x P C46-e
White does not, however, have to wait for the Black Queen to retreat to take this Pawn.
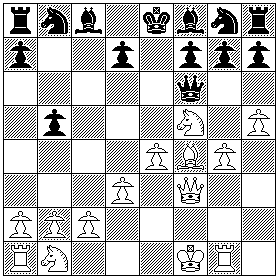
15. ... Qf6 ... Q-B3 ... D66
Black's Queen retreats, but not far.
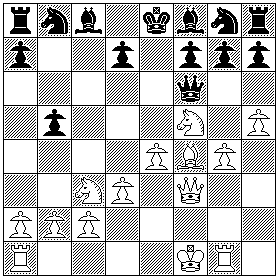
16. Nc3 N-B3 B33
This looks like a standard developing move, which further increases White's lead in development.
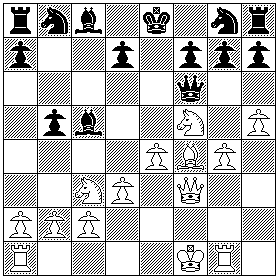
16. ... Bd5 ... B-B4 ... F53
So Black makes a standard developing move, rather than conceding the Queenside to White. Except that Black is also threatening to capture White's King Rook.
H. F. L. Meyer makes the following note on this move:
It is difficult to find a satisfactory answer for Black; White is ready with attacks at various points.
Wilhelm Steinitz makes the following note on this move:
This seems quite as good as anything else, for there were obvious strong answers to any attempt to develop the Queenside. For instance, if the Bishop was played to Q N 2, White would answer Q-KN3, threatening the Knight, and Blacck had then no means to provide against all the different attacks by P-KN5, B-K5, P-K5, which White had at his disposal in answer to any move guarding against the immediate loss of a piece with the inferior position. It is almost a profanation to say that Anderssen himself could not have invented a satisfactory defence to Black's game.
George H. Selkirk makes the following note on this move:
Hoping White would pause in his attack, to save the Rook, giving time for N-K2, allowing Black to Castle in safety.
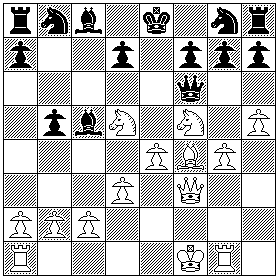
17. Nd5 N-Q5 B54
However, White's standard developing move put his Knight into a position to attack Black's Queen. So once again, White responds to a threat actively, with a counterthreat, instead of simply withdrawing the threatened piece.
Wilhelm Steinitz makes the following note on this move:
Move by move bears the stamp of genius in White's play.
George H. Selkirk makes the following note on this move:
Time is everything now. White dare not relax, even for one move, and Black in turn is compelled to defend himself.
Lionel Kieseritzky makes the following note on this move:
Perfectly well combined.
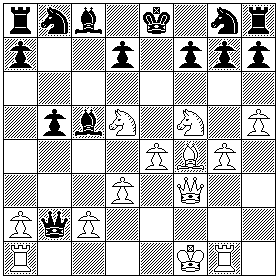
17. ... Q x b2 ... Q x P ... D22-b
But has White made a terrible mistake? Black finally has done something active. In addition to moving far away to capture a Pawn, Black threatens to capture White's Queen Rook with his Queen, which would also give check, even as White's King Rook is exposed to capture from Black's Bishop.
Black does have to do something drastic at this point, though. White's Knight did not simply threaten to capture Black's Queen; it also still threatens to move to c7, forking Black's King and Black's Queen Rook. Another possible move Black could have made on this turn would have been Q-QB3, moving the Queen to c6.
Lionel Kieseritzky makes the following note on this move:
The capture of this Pawn and the attack on the two Rooks fails to produce any of the results for which hope is held out.
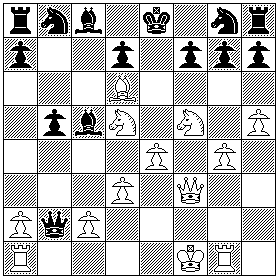
18. Bd6 B-Q6 C64
Has White taken leave of his senses? He calmly ignores both threats to his Rooks, and moves a Bishop. But Black is now forced to do something with his Bishop, or see it taken, even if it is to go ahead and capture White's Rook with it. And that Black bishop was the only thing preventing White from moving his Knight to d6, creating a fork involving a check to the King. So White could indeed have a reason for his moves.
H. F. L. Meyer makes the following note on this move:
White's attack on the King is so strong that he can disregard his Rooks. If 18. NxN, mate in 4 follows.
Wilhelm Steinitz makes the following note on this move:
This and the rest of Anderssen's conduct of the attack mark the limit of ingenuity and brilliancy exhibited in the actual contest up to our time.
George H. Selkirk makes the following note on this move:
A splendid continuation of the attack.
Lionel Kieseritzky makes the following note on this move:
The coup de grâce, which sets at naught all the efforts of the opponent. This game was conducted by Mr. Anderssen with a remarkable talent.

18. ... B x g1 ... B x R ... F17-H
Black is not going to be diverted from his plan by White's apparently inexplicable antics.
George H. Selkirk makes the following note on this move:
If:
18. ...      QxR+
19. K-K2     QxR
If Bishop takes Rook, the variation played in the game ensues.
20. NxKNP+   K-Q1
21. B-QB7++
And if:
18. ...      BxB
19. NxB+     K-Q1
20. NxKBP+   K-K1
21. N-Q6+    K-Q1
22. Q-KB8++
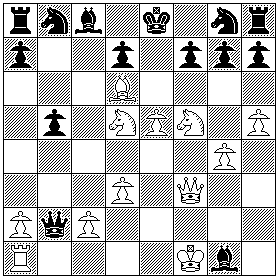
19. e5 P-K5 e55
This is too much! White has a Rook sitting there, waiting to be captured, and there is also a Bishop to be taken before the resulting check would make that impossible, and he advances a Pawn. What can he be thinking?
George H. Selkirk makes the following note on this move:
A most admirable move, effectually shutting out the adverse Queen. This is of the highest order of Chess. Contrast the positions of the two forces - Black, notwithstanding his immense ostensible superiority, is in reality giving odds, for nearly all his pieces are blocked up at home, quite out of play, and he cannot by any sacrifice do more than prolong the game; his position is deplorable.
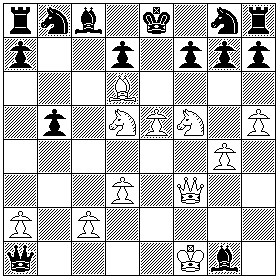
19. ... Q x a1+ ... Q x R+ ... D11-Ax
Black will not be deflected from his course. He will make the obvious move, capturing another Rook, and protecting his Bishop from White's King.
H. F. L. Meyer makes the following note on this move:
19. ... Qb2 would have been better, with the endeavor to draw.
Wilhelm Steinitz makes the following note on this move, in a score in which it takes place as Black's move 18, immediately following B-Q6 by White:
For the benefit of inexperienced students, we point out that BxB would have subjected him to mate in four moves, thus: 18. ... BxB., 19. NxB+ K-Q1, 20. NxP+ K-K1, 21. N-Q6+, any King move, 22. Q-B8++.
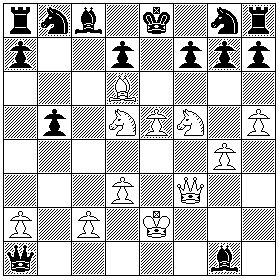
20. Ke2 K-K2 E25
As White must, he moves the King forward. He chooses the square towards the center of the board instead of the one towards the edge, but that is his only choice for this move.
George H. Selkirk makes the following note on this move:
In Horae Divanae, published in 1852 by Mr. Elijah Williams, White's move at this point is given as K-N2. Had this, however, been played, Black, by moving 20. ... B-QN2, would have averted the threatened mate, and in all probability won the game. Captain Kennedy informes me, "I knew the game before it was printed by Williams, or, indeed, printed at all, and distinctly recollect that White's move in question was, as I have stated, 20. K-K2."
Kieseritzky saw what was coming...
20. ... Resigns.
However, accounts of the game tend to include (without noting the actual resignation) what was forthcoming at this point, which I will also present below.
The move immediately following was included in the account of the game in the Wiener Schachzeitung, although it had not been included in the first account of the game in Kieseritzky's own periodical La Régence, as we saw above.
This becomes somewhat significant given what we will see explained in the note to this (possibly hypothetical) move given by George H. Selkirk - although White's sacrifice of a Queen and two Rooks has, of course, already taken place.
Unfortunately for Black, though, his attack on the White King has now run out of steam. So it will be White's turn to attack.
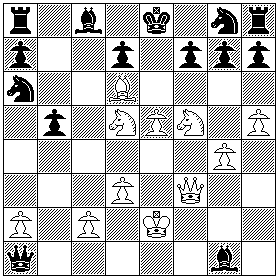
20. ... Na6 ... N-QR3 ... B61
Now that White has moved out of check, his Knight could move to c7, thereby accomplishing a fork of Black's Rook and his King. As this would win a Rook, Black moves his Knight so that it could capture White's Knight if it moves there.
Also, White's Bishop could have taken Black's Knight on the square from which it moved. However, Black's Rook was protecting that Knight, so had the Bishop taken it, the exchange would have been even. If Black had realized the danger his King was in, would moving his Queen Bishop to b7, because it block's the King's flight in the moves to follow, have changed anything, making White's sacrifices unsound?
White also has a win in that case, as chess professionals analyzing this game have found. But there are other moves open to Black. His Queen could take the pawn on e5, giving check, and thus almost forcing the Bishop to capture it. But that Queen sacrifice seems like it would only give a temporary respite.
Since Black's problem, as the next few moves will reveal, is that his King has only black squares to move to, controlled or controllable by the White Bishop, what about advancing his King's Bishop Pawn one square?
The problem is that almost any move other than the text move constitutes a Rook sacrifice. The Knight on a6 can capture White's Knight if it moves to c7, forking both Black's King and Black's Queen Rook. This is the move that Black expected.
One alternative move that is available which is not a Rook sacrifice would be for Black to move the Bishop on White's back rank to b6. That defends the forking square. It is itself liable to capture by White's Knight, but is defended by a Pawn. But that doesn't appear to do much to prevent Black from being mated either: the same course of moves by White as follows the text move would still lead to Black being mated.
Putting a computer chess program to work on the position before this move, the move B-R3, placing Black's Bishop on the square the Knight moved to instead, is recommended. Then, the computer anticipates White will fork the King, the Rook, and this Bishop; the King will move to c8, and White will take the Bishop.
H. F. L. Meyer makes the following note on this move:
This allows a mate in 3 moves. 20. ... Ba6 would have made room for the King, and would have led to a drawn game.
George H. Selkirk makes the following note on this move:
This, of course, is intended to prevent B-QB7++; but it enables White to finish the game in a beautiful style. Black had the choice of three other moves: by none of them, however, can he avoid speedy defeat. In the first place:
20. ...      QxKP+
21. BxQ      P-KB3 (a)
22. NxKNP+   K-B2
If K-Q1, White mates in two moves, by BxBPx and QxN.
23. BxKBP    P-KR3
24. B-K5+    N-KB3
25. QxN+     K-N1
26. N-K7+    K-R2
27. Q-KB5++
Note (a):
21. ... B-QN2
B-QR3 leaves a mate in three moves.
22. N-Q6+    K-Q1
23. NxB+
If the Queen takes the King's Bishop's Pawn at once, Black plays BxN and saves the mate.
23. ...      K-QB1
24. N-Q6+    K-Q1
25. QxKBP    N-KB3
To prevent Q-K8++.
26. Q-K7++
In the second place:
20. ...      B-QN2
21. NxNP+    K-Q1
22. QxKBP
Were White's King on N 2 he could not now make this move, on account of Black's reply 22. ... BxN+, followed by N-QB3.
22. ...      N-KB3 (b)
23. QxN+     K-QB1
24. N-K7++
Note (b):
22. ...      QxKP+
23. BxQ      N-K2
If N-KB3, mate follows as above.
24. N-K6+ PxN
If K-QB1, NxN++.
25. QxN+     K-QB1
26. Q-QB7++
And in the third place:
20. ...      B-QR3
21. NxKNP+   K-Q1
22. QxKBP    QxKP
23. BxQ      K-QB1 (c)
24. Q-KB8+   K-QN2
25. Q-Q6     B-QN3
26. NxB      PxN
27. Q-QB7++
Note (c):
23. ...      N-KB3
24. QxN+     K-QB1
25. Q-Q6     K-Q1
26. K-K6     any King move
27. mate by the Queen
Black has other moves by which he might vary his defence, but he cannot escape. The student will readily percieve White's proper play in each case.
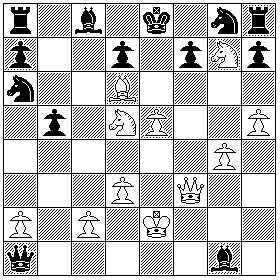
21. N x g7+ N x P+ G77-gx
However, White is unconcerned with the Black King's Knight, and is about to demonstrate why he permitted Black to capture both of his Rooks without any reaction. With this move, White has captured a Black Pawn and placed the Black King in check. White's Bishop, furthermore, eliminates two possible squares for the Black King to move to, leaving that piece only one possible destination square.
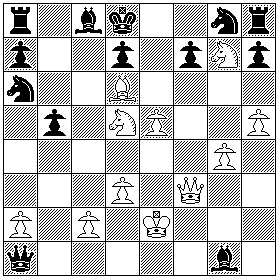
21. ... Kd8 ... K-Q1 ... E84
Black's King indeed moves there. Note that White's Bishop also prevents Black's King from leaving that square by continuing in the other direction.
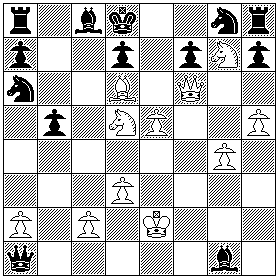
22. Qf6+ Q-B6+ D66x
If it weren't for Black's Knight being able to capture the Queen, this would be checkmate. But Black's Knight can capture the Queen. However, if White let up the attack, say to move his Queen to g5 in two moves, Black could regain the initiative with his material superiority.

22. ... N x f6 ... N x Q ... G66-D
Black captures the Queen, as he must.
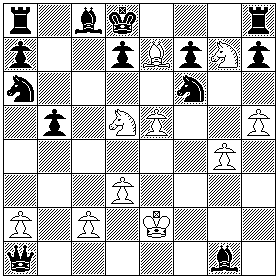
23. Be7++ B-K7++ C75xx
And with Black's Knight out of the way, White moves his Bishop - the one moved to d6 on move 18 while Black was devouring White's Rooks - in to deliver checkmate, defended by his Knight.